• Welcome to the CaliforniaSpecial.com forums! - You are currently viewing the forums as a GUEST. To take advantage of all our site features, please take a moment to join our community! It's fast, simple and absolutely free.

    If you have problems registering or can't log into your account, please contact Admin.

    Please Note: If you are an existing member and your password no longer works, click here to reset it.

1968 Side scoops

franklinair

Well-known member
Joined
Mar 1, 2007
Messages
4,738
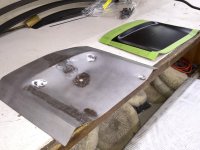
Getting ready to install the 2 new side scoops. Installed the center stud.
The 2 front sheetmetal screw location is perplexing: It appears that the angle for the 2 screws through the front of the scoop is perpendicular to the quarter panel metal. :confused:
PMN's book, page 107 shows a drawing for the factory mounting of the scoops, but it doesn't make sense to me for the 2 screws' angle into the sheetmetal.
Anyone dealt with this?

Another curiosity- My Black CS scoops don't even have the recesses where these 2 screws are supposed to go.

Neil
 

robert campbell

Well-known member
Joined
Apr 10, 2007
Messages
4,321
They do go in at a small angle. The side scoop is "countersunk" angled to the quarter and the screws must match this angle. I have one original on my car and two original spares.

Would you like a picture of the spares in a close up for the holes?

Rob
 

dalorzo_f

Well-known member
Joined
Jan 7, 2006
Messages
1,886
Location
Brisbane Australia
On mine the screw angle was pretty critical, the screws barely cleared the edge of the holes so be sure it is aligned right. As if not when installing you might chip the paint on the lip.
 
OP
OP
franklinair

franklinair

Well-known member
Joined
Mar 1, 2007
Messages
4,738
Rob; a photo could help.

Richard; I thought I would first drill through the scoop at the correct angle for the screw alignment. Then with the scoop in place against the 1/4 panel, insert a drill bit through the pre-drilled hole and gently mark the painted surface of the 1/4 panel. Then drill the 1/4 panel holes. (Just seems kinda flukey to me- using a screw at a 45 degree+/- angle to secure the scoop.)

Neil
 

robert campbell

Well-known member
Joined
Apr 10, 2007
Messages
4,321
Dad,
I will get photo tomorrow. Richard is all over it! Secure the scoop to the car with the center bolt. Then carefully use a small scratch awl or small center punch to mark the spot on the quarter though the scoop holes. Remove the scoop and punch the quarter to make the exact location. Then drill a hole at the appropriate angle (45 degrees) and screw the screws in at a 45 degree angle to ensure the proper angle.

Do all of this before paint and such. Then be careful when they are painted to screw down very gently.

Rob
 

dalorzo_f

Well-known member
Joined
Jan 7, 2006
Messages
1,886
Location
Brisbane Australia
Here are a few shots from my recent (and ongoing) "repaint".. of the area with the holes. I'll go out and unscrew a couple screws and post some photos to show the angle...


robert campbell

Well-known member
Joined
Apr 10, 2007
Messages
4,321
Dad,
Pictures of one of my original spares. On the back side, notice the holes are centered on the edge of the area that bolts to the body. Richard's pics clearly show the angle the screws go in. Fit them up before the painting!!

Rob


dalorzo_f

Well-known member
Joined
Jan 7, 2006
Messages
1,886
Location
Brisbane Australia
Mine are so tight that I can't back one out without removing the stud and the entire scoop from the body without scratching the paint on the edge of the screw holes. The screws go in at about a 45 degree angle and are pretty much level....

Good luck, sure it will come out fine!
 

Ruppstang

Well-known member
Joined
May 22, 2009
Messages
3,024
Do not forget the clear RTV seal around them when you are finished.
Marty
 

Ruppstang

Well-known member
Joined
May 22, 2009
Messages
3,024
Here is a pic of a sealed scoop.
 

Attachments

  • 68 silicone scoop detail 001.jpg
    68 silicone scoop detail 001.jpg
    45.8 KB · Views: 52
OP
OP
franklinair

franklinair

Well-known member
Joined
Mar 1, 2007
Messages
4,738
This is the first reference I've heard of sealant around the side scoops on driver or concourse cars. Was this a factory practice, or personal preference?

Neil
 

Ruppstang

Well-known member
Joined
May 22, 2009
Messages
3,024
I can not say 100 present that Ford did it on the GTCS and HCS cars but it was part of the Shelby assembly. It was also used on the rear quarter extensions as well. In fact when judging Shelby's we deduct if it is not present. Even if our cars did not come with it I would still use it just to keep everything tight and clean. Most people would never even see that it was there.
Marty
 

somethingspecial

Well-known member
Joined
Aug 13, 2005
Messages
1,795
It is my honest opinion Ford did not silicone the side scoops. I have seen many CS cars, Original, unrestored, or taken apart, and I have yet to see evidence on CSs there was any silicone used.
 

Ruppstang

Well-known member
Joined
May 22, 2009
Messages
3,024
I would not be surprised that the sealant was not used on the GTCS because Ford was not that quality driven at that time. Another example would be that on the Shelby's there was a adjustable hood style bumper on the rear trunk lip, Ford just put a piece of tape weather strip on the deck lid to get by.
I know Scott Fuller has a unrestored GTCS and he may be able to tell us for sure whether there was sealant or not .
Marty
 
OP
OP
franklinair

franklinair

Well-known member
Joined
Mar 1, 2007
Messages
4,738
I would suspect that Shelby side scoops (with functional scoops for rear brake cooling) were sealed around the edges in order to minimize airflow loss for the cooling ducts.
As the CS/HCS scoops are ornamental, I can't imagine Ford expending the time/cost required for sealing.

Neil
 

Ruppstang

Well-known member
Joined
May 22, 2009
Messages
3,024
I would suspect that Shelby side scoops (with functional scoops for rear brake cooling) were sealed around the edges in order to minimize airflow loss for the cooling ducts.
As the CS/HCS scoops are ornamental, I can't imagine Ford expending the time/cost required for sealing.

Neil

Neil I thought of that too, but as I said Shelby also sealed the rear quarter extensions too. The standard quarter extension used a rubber seal that was not used on the fiberglass parts, thus the reasoning for the silicone seal.
 

GTCSMustang

Well-known member
Joined
Mar 16, 2003
Messages
719
1968 Shelby scoops are not functional. They do however have sealant around them as well as the rear quarter extensions and the headlight buckets. No GT/CS or HCS that I have seen has the sealant.

Scott
 

Ruppstang

Well-known member
Joined
May 22, 2009
Messages
3,024
1968 Shelby scoops are not functional. They do however have sealant around them as well as the rear quarter extensions and the headlight buckets. No GT/CS or HCS that I have seen has the sealant.

Scott

Thanks Scott,
That is good to finally know for sure. I would like to know on your unrestored HCS are the Marshal fog light brackets and grill rivets all painted the dark argent?
Marty
 

Ruppstang

Well-known member
Joined
May 22, 2009
Messages
3,024
While we are disusing the side scoops I would like to add that if you are replacing rear quarter panels unless they are NOS the scoop profile will not be correct and the GTCS scoop will not fit. We had to replace the LH side of our HCS project and ended up cutting out the original scoop area and welding it in to the new quarter. It would be a sad day if you discovered this after the car had been painted.
Marty
 

Attachments

  • Photo Apr 21, 10 49 55 AM.jpg
    Photo Apr 21, 10 49 55 AM.jpg
    88.8 KB · Views: 39
  • Photo Apr 22, 2 22 33 PM.jpg
    Photo Apr 22, 2 22 33 PM.jpg
    89.8 KB · Views: 32
Top