• Welcome to the CaliforniaSpecial.com forums! - You are currently viewing the forums as a GUEST. To take advantage of all our site features, please take a moment to join our community! It's fast, simple and absolutely free.

    If you have problems registering or can't log into your account, please contact Admin.

    Please Note: If you are an existing member and your password no longer works, click here to reset it.

1968 Rear window

Maine gt/cs

Well-known member
Joined
Feb 15, 2011
Messages
145
Location
Bangor,Maine
I am looking to replace the rear window in the gt/cs. Has anyone had any experience with Vintage Autoglass (e-bay name) or Vintage Glass USA in Connecticut.They have a tinted window for $219.00 with free shipping. Not a bad price I think. Just would like to know how the quality of the glass is. I have found a couple of original carlite windows in ok condition but for crazy prices. One was $450.00 and the other was $400.00. Thank you for any reply's.

Tim
 

dalorzo_f

Well-known member
Joined
Jan 7, 2006
Messages
1,886
Location
Brisbane Australia
Actually those prices are not too bad for a clean original. Repros run $200-300.

Have not used either vendor noted.

One key thing to look at is the thickness of the glass. Some repros are quite a bit thinner and can be hard to seal. Originals are about 9/32" (7mm) thick. Have seen repros about 2/3rd of that. They "work" but just be sure to put a good amount of sealer in the gasket.

On installation, here's my workflow:

1. put gasket on window, let sit for a day to stretch out.
2. remove and palce a small bead of sealant (non hardening, do not use urethane) in the groove (abot a 1/8" bead, cut a small hole in the nozzle and jam it right to the base of the groove while putting it in place)
3. put a small bead of sealant, about 1/8" diameter, at the base of each clip, just about a 1" strip. Helps seal the clip (common leak area) but will not result in a lot of goo inside the car after pulling.
4.put gasket on window, wipe off any excess that goops out (should not be much)
5. install pull cord (3/16", 4-5mm nylon works great) put assembly in window frame
6. Pull gasket over lip
7. Seal gasket to body, use a fine tip and jam it as far into the gap as you can, work slowly and allow the selant to fill the voids. I work away from the tip and watch the bead and move at varying speed to keep a fairly even fill as the sealer oozes up from the crevice behind the tip. I do a low pass then a "topcoat" and press in place with a wet finger after each.

HTH
 

gtcs1

Well-known member
Joined
Jun 17, 2006
Messages
350
Actually those prices are not too bad for a clean original. Repros run $200-300.

Have not used either vendor noted.

One key thing to look at is the thickness of the glass. Some repros are quite a bit thinner and can be hard to seal. Originals are about 9/32" (7mm) thick. Have seen repros about 2/3rd of that. They "work" but just be sure to put a good amount of sealer in the gasket.

On installation, here's my workflow:

1. put gasket on window, let sit for a day to stretch out.
2. remove and palce a small bead of sealant (non hardening, do not use urethane) in the groove (abot a 1/8" bead, cut a small hole in the nozzle and jam it right to the base of the groove while putting it in place)
3. put a small bead of sealant, about 1/8" diameter, at the base of each clip, just about a 1" strip. Helps seal the clip (common leak area) but will not result in a lot of goo inside the car after pulling.
4.put gasket on window, wipe off any excess that goops out (should not be much)
5. install pull cord (3/16", 4-5mm nylon works great) put assembly in window frame
6. Pull gasket over lip
7. Seal gasket to body, use a fine tip and jam it as far into the gap as you can, work slowly and allow the selant to fill the voids. I work away from the tip and watch the bead and move at varying speed to keep a fairly even fill as the sealer oozes up from the crevice behind the tip. I do a low pass then a "topcoat" and press in place with a wet finger after each.

HTH

Hi,

This is very interesting. Could you expand on no7 for me, to ensure I understand better. Thanks
 

dalorzo_f

Well-known member
Joined
Jan 7, 2006
Messages
1,886
Location
Brisbane Australia
Ok, here's a crude and quick sketch. Left side is section, right side is top view.


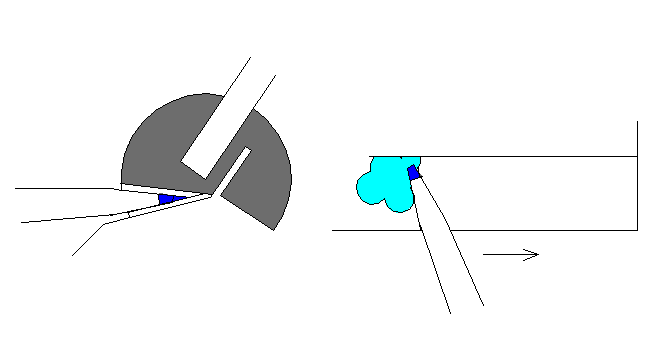
Example is windscreen. You've jammed the tip, cut very small, 1/8" diameter max, into the gap between the body and seal. Almost to the base. About 30-45 degrees of angle from perpendicular, you want the goop to go "down" as well as back...

Lean the upper part of the nozzle in the direction of motion, "pulling" the bead. As you squeeze, the goop will backfill behind the tip, working it down and into the groove, and oozing up behind the tip. Watch that for when it comes up to a common level, I like the first pass about 1/8" or so below the seal, but it will vary. As you hit voids the fill rate will change so work VERY slowly and watch the bead to keep moving, not some standard set rate of motion.

It gets a bit tricky around the clips, but the initial 1" bead at the base provides some base seal, and work slowly around them and you can get a good seal.

After you do pass 1, press it in with a finger. The second layer can just go over the top, no need to stick the nozzle back in, and you can cut a slightly larger tip to fill it faster for the "top coat".

Hopefully this makes more sense.
 
Top