• Welcome to the CaliforniaSpecial.com forums! - You are currently viewing the forums as a GUEST. To take advantage of all our site features, please take a moment to join our community! It's fast, simple and absolutely free.

    If you have problems registering or can't log into your account, please contact Admin.

    Please Note: If you are an existing member and your password no longer works, click here to reset it.

1968 Cosmetic Questions - Keeping it correct

OP
OP
Cool Manchu

Cool Manchu

Well-known member
Joined
Apr 5, 2014
Messages
145
Location
San Jose, CA
Just to deepen the mysteries of the car...I just spoke to the original owner and was able to get some insight on what is and isn't original on the car.

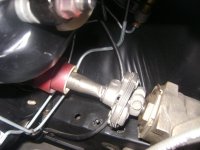
The dual exhaust was installed by him, essentially as a "day two" addition.

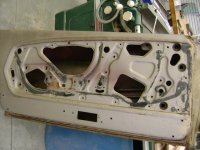
However, beyond that he stated, "beyond the front end damage and adding the second exhaust, everything else on the car is completely original. Including the door panels, which have a red/white light on the black part on them. It's how it came off the lot. I made no further modifications."
 

Tequila

Well-known member
Joined
Sep 29, 2013
Messages
347
For the weatherstripping. I see that CJPony has a complete kit, is this one recommended? Is it complete and does it fit properly?

http://www.cjponyparts.com/weatherstrip-kit-coupe-1967-1968/p/WSKIT4/

Or am I better off going another route?

I would not recommend the CJ Pony Parts complete set. I bought the set and tried matching up the window to body seals as well as the quarter post seals and they are far off. The contours, the cutouts are quite a bit off on these Made in Taiwan set. I had to scrap mine and buy new seals from Laurelmountainmustang. They were a bit more expensive but they seem to match up much better. My car is still waiting to be stripped and painted so I have not tried any of the other weather stripping.

This is only my opinion and is not intended to discredit the vendor or any associated parties. I do buy a lot of items from CJ parts and in general have had good experience with them.
 
OP
OP
Cool Manchu

Cool Manchu

Well-known member
Joined
Apr 5, 2014
Messages
145
Location
San Jose, CA
Another question for anyone who knows...

Would the "Powered By Ford" valve covers been correct for a 289 2v? Or would those have been a later addition?
 

CougarCJ

Well-known member
Joined
Jul 17, 2006
Messages
2,191
1967 was the last year for the smooth valve covers. 1968 started the "Powered by Ford" valve covers on a small block V-8.
 

Ruppstang

Well-known member
Joined
May 22, 2009
Messages
3,034
Here is a picture showing the square holes that hold the plastic inserts for the screws. Most owners do not go to all of the work to make the square holes. Well unless you are Rob, he is the man!
It should be a good way to tell if the grills are factory. Let us know what you find. Marty
 

Attachments

  • 005.JPG
    005.JPG
    147.9 KB · Views: 30

robert campbell

Well-known member
Joined
Apr 10, 2007
Messages
4,321
I found the proper drill bit and then filed them square very slowly and very carefully.... And very time consuming.... Neil is laughing at me....

Rob
 
OP
OP
Cool Manchu

Cool Manchu

Well-known member
Joined
Apr 5, 2014
Messages
145
Location
San Jose, CA
Thanks so much for the insight on the holes and the picture. It is greatly helpful. Is there a good way to remove the panel? Or will it be obvious when I am looking at it?
 

Ruppstang

Well-known member
Joined
May 22, 2009
Messages
3,034
I use a small forked flat bar wrapped in tape to get on both sides of the spring clip retainers. A flexible putty knife will work but you want to be as close to the clip as possible before you pry up on it other wise you can crack the panel. You do not need you remove the panel to check the holes that we are talking about. Just remove the screws in the grill.
Marty
 
OP
OP
Cool Manchu

Cool Manchu

Well-known member
Joined
Apr 5, 2014
Messages
145
Location
San Jose, CA
Thanks Marty, I will check the screws and see if they have the plastic backing or not. That should be telling to some degree.
 
OP
OP
Cool Manchu

Cool Manchu

Well-known member
Joined
Apr 5, 2014
Messages
145
Location
San Jose, CA
I was unable to get to the speaker panels today, I did take one close up, but it doesn't help.

10496163_10152107614576408_3922050055160359137_o.jpg


On the other hand, I able to confirm that my car is numbers matching.

10271210_10152107616151408_7358289782363480979_o.jpg


10450117_10152107616251408_5420402672917796944_o.jpg


It's interesting being able to see the car. Some things look better than I remembered and others things look worse. I see I have a massive hill to climb...but I am trying and everyone's insight around here sure makes it all the easier.

Thank you everyone for your support through this process. I hope to have something decent one day. :)
 

Ruppstang

Well-known member
Joined
May 22, 2009
Messages
3,034
That hill is climbed one step at a time. Some times there are steps backwards and that is discouraging. Patients and perseverance are your two best friends.
Congrats on the numbers matching, it certainly makes your car more desirable.
 
OP
OP
Cool Manchu

Cool Manchu

Well-known member
Joined
Apr 5, 2014
Messages
145
Location
San Jose, CA
Thanks for the words of encouragement Marty.

I am thinking about how bad the engine bay looks. I am going to have it repainted, but everything else inside really looks like it's been through the ringer...

10334411_10152109824261408_4796843553009482485_n.jpg


I think that I should consider a new wiring harness, however, I have convenience group in the console...does anyone know if this will cause me specific issues in rewiring the car?

Also, what else should I consider to dress up under the hood, keeping it as close to correct as possible.
 

Mosesatm

Well-known member
Joined
Jan 18, 2005
Messages
9,034
The engine compartment can get a little tricky because of the transition from black to red oxide.

I guess one way to describe the transition is to say that when looking down your should see black, but when looking up from under the car you should see red oxide, more or less.

I think Richard has a good photo of a detailed firewall area, and Jeff is our resident expert.

Here is a thread with some good photos.
http://californiaspecial.com/forums/showthread.php?t=10633&highlight=brake+lines
 
Last edited:

Ruppstang

Well-known member
Joined
May 22, 2009
Messages
3,034
You will need to pull out the steering column and bead blast or soak in Evaporust the rusted portion. Unless you are building a Concours car I would paint the bare metal parts with cast blast paint. The bottom of the tube is painted your interior color.
Marty
 

Attachments

  • 68 steering collumn 003.jpg
    68 steering collumn 003.jpg
    73 KB · Views: 31
Top