• Welcome to the CaliforniaSpecial.com forums! - You are currently viewing the forums as a GUEST. To take advantage of all our site features, please take a moment to join our community! It's fast, simple and absolutely free.

    If you have problems registering or can't log into your account, please contact Admin.

    Please Note: If you are an existing member and your password no longer works, click here to reset it.

Need help on installing and measurements on CS stripe,please!

mnut

Active member
Joined
Dec 21, 2006
Messages
36
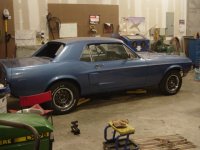
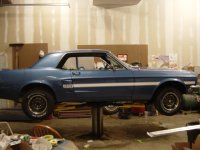
I just got my cs painted(yep...jumpin' for joy!) and now will order a stripe kit from the fellow in CA that Bob Teets recommends.Boy,is he full of info such as Steve too.What a bunch of help I've received so far from people on this site.I need help on my resto as no one around here has a CS or HC car I can reference from in person.
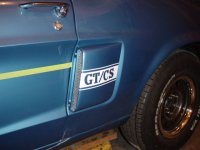
Are there any "tricks" I should know about before attempting the stripe installation? Does anyone have the correct measurements I need especially for the trunk? I forgot to take measurements on the trunk and front of the front fenders before stripping the car.
Also,is there a good brand of double sided tape to use to glue down the thin washers to the hood under the twist locks?Was that black stuff under the washer that the factory used a glue or tape as mine were original?
I'll say thanks in advance for the help as I know it's on its way!
Bob in Ohio
 

franklinair

Well-known member
Joined
Mar 1, 2007
Messages
4,744
PFSlim wrote some perfect installation tips. It's a thread on the restoration page of this site.
I have been told that Paul Newitt's GT/CS Recognition Guide has the striping layout/measurements.
Past experience taught me: go slow, and have a third hand available.
 

PFSlim

Well-known member
Joined
Feb 9, 2004
Messages
1,546
Location
Weatherby Lake, MO
Bob

Follow the instructions on the restoration page and please use the measurements from Paul Newitt's book. One big thing to ensure is to have a spray bottle of soapy water ready and use it. Get everyone away from the car as it is only a one or two person job. It takes a steady hand and no interuptions for success.

We are here to help. Ask as many questions as needed.

Good luck.

Paul
 
P

PNewitt

Guest
Thanks, CJ. You guys are too quick! LOL! That saved me from looking for that diagram from my book--in my CS file. I got too much stuff!

That diagram was based on my own GT/CS's original stripes on the original maroon paint.

Paul (PFSlim)'s advice is good: Taking the time to do it right will pay off for years to come. Pay close attention to how the front piece is high enough to clear above the front bumper--and that it's on the side scoop properly, and not crooked...

Look down the side of the car as they are applied--to make sure they are straight. You don't want sagging stripes....LOL!

Good luck!

Paul N.
 

zozobra

Well-known member
Joined
Mar 1, 2006
Messages
66
Location
Albuquerque, New Mexico
Talk about timing. I'm considering redoing the stripes on my car this weekend. A year ago a youngeter at a car show pointed out that the ones I currently have too much rise in the front and go to the froint fender wheel opening. Turns out the front is almost right but the back is off well over an inch. I did talk to someone Monday who puts stripes on cars professionally who asked about the age of the new stripes. I told him I bought mine just under a year ago, actually about 8-9 months ago. He said the stripe kits have a shelf like of about a year. Any thruth to that? Any concerns? They have been in their box in a garage cabinet in relatively confortable climate with an almost constant temperature.

The other concern I have is that I assume the smaller stripes, above and below the large center stripe, are independent of the center stripe once the backing is off and could got their own way if one is not careful. Is that a big deal?
 

PFSlim

Well-known member
Joined
Feb 9, 2004
Messages
1,546
Location
Weatherby Lake, MO
I can not really address the age of a stripe and if that is bad or good. Once again, I would recommend you to talk to Steve (the stripe guy) and ask for his advise.

You are correct in stating that the smaller stripes (top and bottom) are independent of the center stripe. The thing I noticed most is that I liked to use a lot of soapy water. It is applied to the car and then place the stripes on. By using a lot of soapy water, it allows you to move the stripe in place before removing the outside backing. While doing this and not waiting for the stripes to dry alittle bit, the small stripes want to drift or move more freely that the center stripe. You just have to be very careful. I also recommend using a good plastic bondo applicator as you remove the outside backing. You can use it to keep the smaller stripes in place and remove air bubbles as needed.

Take a look at my post on the restoration forum. I think this will help. Ask away for any other questions. The stripes are not difficult to put on and is rewarding once they are on and in place.

Paul
 

Mosesatm

Well-known member
Joined
Jan 18, 2005
Messages
9,029
When I installed the stripes on my car I started with the dimensions from Paul's book but quickly decided they would not work on my car, so I leveled the car and found the stripe height by measuring from the garage floor.

For side stripes the tricky ones are the scoop stripe and the front stripe, since they protrude or have protrusions near them. That's why I measured from the floor. I also set up a laser level just to make sure.

I seem to take a little different approach to installing the stripes, too in that I don't use water at all. My approach is to tape the stripe where I want it then place pieces of tape along the top of the stripe backing as a guide. Then I release half the stripe (leaving he pieces of tape as a guide), cut the underside backing off that half, and gently work the stripe from the center to the end. Continually working it to prevent any air bubbles. Once that half is set I do the other side.

With the outer backing still in place I then use a little rubber spreader to again press the stripe firmly to the car. The backing protects the stripe during this process.

The next step is where one can get into a little trouble if not careful. GENTLY AND SLOWLY pull off the outer backing, watching the 2 small stripes the whole time. If the car is clean, free of wax, and you pushed the stripes on firmly, the backing should pull right off without disturbing the outer stripes.

The outer backing keeps the small outer stripes in place so you shouldn't need to worry about them moving around relative to the center stripe.

If you get an air bubble just poke it with a pin or the tip of a razor blade (don't cut it, just poke it), then work the bubble from the outer edges to the center. It will magically disappear! Working it towards the center also forces the adhesive back into the hole sealing it up.
 
Last edited:
OP
OP
M

mnut

Active member
Joined
Dec 21, 2006
Messages
36
Thanks a lot for all the help so far.I'm going to make sure I order the stripes from Steve the stripe guy.HC Bob made the point to me about how long do the stripes sit on a shelf at a commercial Mustang parts dealer? I think I'll stick with fresh!
In my second question I asked if anyone can tell me what sort of glue or double sided tape to use on the twist lock washers against the newly painted hood. Any ideas?
Another quick question...do the twist lock catch brackets welded on the rad support get the same black paint as the engine bay?
Yep...one more...The hood hinges near the firewall get painted the "cast iron black" paint ...correct as in the 65-66 cars? as does the rod(mounted at the top of the hood latch support brace) that catches the hook on hood latch assy? I painted the hood latch assy at the front underside of the hood the engine bay black too...
Thanks again to all who replied.
Boy,this is the fun stuff now with reassembly after stripping down to the bare metal and painting it completely.That's a lotta work but it sure was a pleasure having a solid CA car to start with.Us 'ol eastern guys appreciate the western cars more than anyone I suppose?Old cars get eaten up out here with all the salt Ohio lays down in the winter.Back to the garage!
Bob in Ohio
 

Mosesatm

Well-known member
Joined
Jan 18, 2005
Messages
9,029
Herer are a few pages from the "'65-'73 Mustang's Detailing Reference Guide"
 
Last edited:

Mosesatm

Well-known member
Joined
Jan 18, 2005
Messages
9,029
When I installed the stripes on my car I started with the dimensions from Paul's book but quickly decided they would not work on my car,

Paul, this probably came across poorly. I was trying to say that since every car is different the diminsions from your car didn't work for mine, not that your dimensins are incorrect.
 

zozobra

Well-known member
Joined
Mar 1, 2006
Messages
66
Location
Albuquerque, New Mexico
The old stripes

I guess I ought to ask the other obvious question, namely how to safely get the old stripes off. I realize that this is another area in which there is no hurray at all and great caution is required. I assume a heat gun is the best way to get them off. Is there any sage advice on how to safely get them off?

Much thanks. You guy have been tremendously helpful in getting this car in running shape and looking good.
 

PFSlim

Well-known member
Joined
Feb 9, 2004
Messages
1,546
Location
Weatherby Lake, MO
I have heard that using a heat gun will do the trick. I would say just approach it slowly and with different amounts of heat to see how it comes off.

Paul
 

PFSlim

Well-known member
Joined
Feb 9, 2004
Messages
1,546
Location
Weatherby Lake, MO
Stripe installation.

Paul
 

Attachments

  • Stang449.JPG
    Stang449.JPG
    61.5 KB · Views: 26
  • Stang471.JPG
    Stang471.JPG
    59.7 KB · Views: 20
  • Stang472.JPG
    Stang472.JPG
    59.9 KB · Views: 29
  • Stang18.JPG
    Stang18.JPG
    59.8 KB · Views: 32
Top