• Welcome to the CaliforniaSpecial.com forums! - You are currently viewing the forums as a GUEST. To take advantage of all our site features, please take a moment to join our community! It's fast, simple and absolutely free.

    If you have problems registering or can't log into your account, please contact Admin.

    Please Note: If you are an existing member and your password no longer works, click here to reset it.

1968 Active brake ducts on Sara's CS

Forsche

Well-known member
Joined
Jan 12, 2013
Messages
219
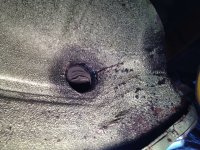
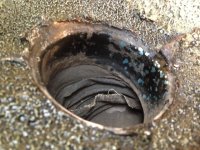
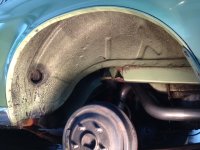
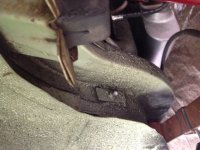
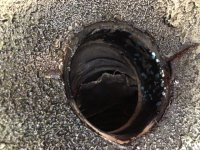
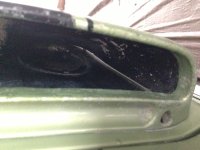
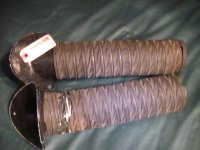
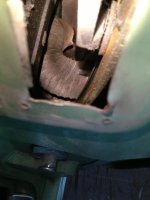
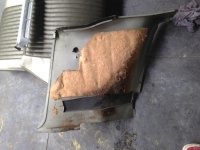
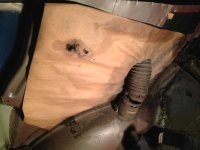
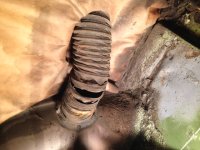
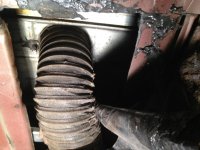
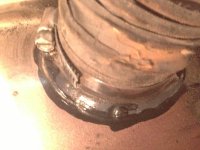
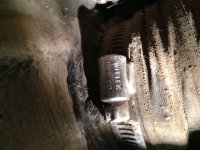
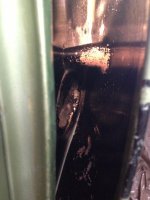
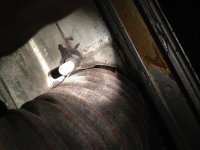
Spent some time cleaning in the rear wheel wells today. Got some much better pictures of the brake ducts. This one continues to baffle since these look professionally done and also look like the nos Shelby ducts that I have seen on ebay. Looks like they were installed before undercoating? Can't imagine why these were installed on this car with drum brakes.

Thought you all might enjoy seeing this oddity.....

Steve
 

Attachments

  • photo-70.JPG
    photo-70.JPG
    131 KB · Views: 67
  • photo-69.JPG
    photo-69.JPG
    156.5 KB · Views: 66
  • photo-68.JPG
    photo-68.JPG
    143.3 KB · Views: 78
  • photo-67.JPG
    photo-67.JPG
    135.6 KB · Views: 62
  • photo-66.JPG
    photo-66.JPG
    191.3 KB · Views: 66

dalorzo_f

Well-known member
Joined
Jan 7, 2006
Messages
1,886
Location
Brisbane Australia
Interested in the inside aspect, been considering this on a project and wondering how to accomodate a scoop/shoud in the rear 1/4 window area...
 
OP
OP
F

Forsche

Well-known member
Joined
Jan 12, 2013
Messages
219
Interested in the inside aspect, been considering this on a project and wondering how to accomodate a scoop/shoud in the rear 1/4 window area...

Haven't taken a look at it from the inside but if I get a chance in the next few days I'll see what I can find.

Steve
 

g scott

Member
Joined
Dec 20, 2012
Messages
13
Location
Porterville, Ca.
I installed an air duct in my 65 fastback. Not a bad job at all. It looks really clean. Shelby builders did it back in the day but pop rivited it in If I remember correctly. I used aluminum dryer vent hose connecting the vents. The kit came with the plastic tubing like swimming pool vacumn hose only thinner which I tossed. Doesn't do any good unless your into Trans Am Racing. It just falls into the, I didn't need it but It's COOL! lol. gary
 

dalorzo_f

Well-known member
Joined
Jan 7, 2006
Messages
1,886
Location
Brisbane Australia
Yeah, but Shelby's back-in-the-day were fastbacks with no rear 1/4 window to deal with, as on a GT/CS! :wink:

On the Sara car, I take it someone manually carved out the face of the scoop too? Or are they actual Shelby style, slight differences in the two AFAIK.

As with interior duct work interested in pics.
 
OP
OP
F

Forsche

Well-known member
Joined
Jan 12, 2013
Messages
219
Yeah, but Shelby's back-in-the-day were fastbacks with no rear 1/4 window to deal with, as on a GT/CS! :wink:

On the Sara car, I take it someone manually carved out the face of the scoop too? Or are they actual Shelby style, slight differences in the two AFAIK.

As with interior duct work interested in pics.

Do you know how the shelby ducts differ? I'll see if I can detect any sign of them being cut out.
 

dalorzo_f

Well-known member
Joined
Jan 7, 2006
Messages
1,886
Location
Brisbane Australia
I am not sure... posted, then looked further at some ref materials that conflicted.

The GT/CS book says Shelby and GT/CS scoops differed, due to the opening.

But then looked further into the '68 Shelby's and most sites dealing with Shelby's (and a few folks I know the rep of and trust) post that lower scoops were non-functional on '68 Shelby's.

So maybe the same item...

I dunno....:confused:

Still interested in pics of the setup in detail!! Can you please post a few pics of the scoops from the outside/front?
 
OP
OP
F

Forsche

Well-known member
Joined
Jan 12, 2013
Messages
219
I am not sure... posted, then looked further at some ref materials that conflicted.

The GT/CS book says Shelby and GT/CS scoops differed, due to the opening.

But then looked further into the '68 Shelby's and most sites dealing with Shelby's (and a few folks I know the rep of and trust) post that lower scoops were non-functional on '68 Shelby's.

So maybe the same item...

I dunno....:confused:

Still interested in pics of the setup in detail!! Can you please post a few pics of the scoops from the outside/front?

Ok. Will take a few pics of the scoop and see what other good pics I can get of the set-up. Thanks.

Steve
 
OP
OP
F

Forsche

Well-known member
Joined
Jan 12, 2013
Messages
219
I am not sure... posted, then looked further at some ref materials that conflicted.

The GT/CS book says Shelby and GT/CS scoops differed, due to the opening.

But then looked further into the '68 Shelby's and most sites dealing with Shelby's (and a few folks I know the rep of and trust) post that lower scoops were non-functional on '68 Shelby's.

So maybe the same item...

I dunno....:confused:

Still interested in pics of the setup in detail!! Can you please post a few pics of the scoops from the outside/front?

Here are a few pics. Do the quarter windows roll down all the way normally? Ours stop as shown in the pics. Maybe this is one way the vents are accommodated? The scoops do not look modified by cutting out but perhaps are. Took one pic inside by removing the quarter window door rubber. Its not great but gives you an idea. Are the interior panels difficult to remove so I could get better pics?

Also added a pic of the shelby ducting that I have seen on ebay.
 

Attachments

  • photo-74.JPG
    photo-74.JPG
    112.9 KB · Views: 58
  • $(KGrHqJ,!lYFDOG6t1lTBQ17S2)6MQ~~60_57.JPG
    $(KGrHqJ,!lYFDOG6t1lTBQ17S2)6MQ~~60_57.JPG
    144.5 KB · Views: 47
  • photo-72.jpg
    photo-72.jpg
    59.2 KB · Views: 54
  • photo-73.jpg
    photo-73.jpg
    62.5 KB · Views: 49
  • photo-71.jpg
    photo-71.jpg
    84 KB · Views: 49
  • photo-75.JPG
    photo-75.JPG
    79.4 KB · Views: 48
Last edited:

dalorzo_f

Well-known member
Joined
Jan 7, 2006
Messages
1,886
Location
Brisbane Australia
interesting. hard to see the tiny phots (at leat on my monitor).

The windows tend to stick up a tiny bit, but not as much as you show, the limit of the window stopped by the duct.

Hard to tell from the photos how the duct connects to the scoops, and if they are trimmed out GT/CS or the open Shelby type or even a repro. The one shot showing an oval in the scoop, is that just duct pushed thru and squeezed into and oval shape inside the scoop?

In any case definitely a non-factory job IMHO. If you do get it apart still keen to see more pics on how they did the scoop and duct install routing in the window area...
 
OP
OP
F

Forsche

Well-known member
Joined
Jan 12, 2013
Messages
219
interesting. hard to see the tiny phots (at leat on my monitor).

The windows tend to stick up a tiny bit, but not as much as you show, the limit of the window stopped by the duct.

Hard to tell from the photos how the duct connects to the scoops, and if they are trimmed out GT/CS or the open Shelby type or even a repro. The one shot showing an oval in the scoop, is that just duct pushed thru and squeezed into and oval shape inside the scoop?

In any case definitely a non-factory job IMHO. If you do get it apart still keen to see more pics on how they did the scoop and duct install routing in the window area...

You should be able to click on the links and enlarge them. Does it not work for you?

As for the duct, there seems to be metal collar on both ends of the duct so it is a very finished appearance on both ends.
 

dalorzo_f

Well-known member
Joined
Jan 7, 2006
Messages
1,886
Location
Brisbane Australia
They "enlarge" but not a great amount... the scoops appear to be fabricated with the cutout, but hard to tell.

To get the inner panel out;:

- Push back on the front edge of the rear seat bottom, lift, remove
- Remove 2 screws holding seat back lower edge to body, lift up and remove
- Remove the window winder
- Remove the windlace from the jamb
- Unscrew the 3-4 (I forget) screws holding the side panel to the body and carefully lift out
- Remove water shield

That's about it...
 
OP
OP
F

Forsche

Well-known member
Joined
Jan 12, 2013
Messages
219
They "enlarge" but not a great amount... the scoops appear to be fabricated with the cutout, but hard to tell.

To get the inner panel out;:

- Push back on the front edge of the rear seat bottom, lift, remove
- Remove 2 screws holding seat back lower edge to body, lift up and remove
- Remove the window winder
- Remove the windlace from the jamb
- Unscrew the 3-4 (I forget) screws holding the side panel to the body and carefully lift out
- Remove water shield

That's about it...

Do standard GT/CS scoope have a back? As I recall these do not as you can see day-light on the sides of the scoop in one of the pics. Without a back the cut-out would not be a fabricated part of the scoop.

I'll try to take a closer look this weekend. Thanks for the guidance on accessing from inside.
 
OP
OP
F

Forsche

Well-known member
Joined
Jan 12, 2013
Messages
219
Do not think either had a back. But did see these...

29076J_std.jpg


Not sure if they are originals or not.

Yup I've seen those too. Not the type on the CS. The ones on the car have a small cone-shape towards the center of the inside of the scoop which looks to be adding support to the scoop and also (I'm guessing) has a bolt or screw going into it from the inside to hold the scoop on. Is this support or connector on the original scoops? Looks to me like the scoop on ours is held on by two screws at the front and then one going through this conical shaped piece which is part of the scoop itself.
 
Last edited:
OP
OP
F

Forsche

Well-known member
Joined
Jan 12, 2013
Messages
219
Do standard GT/CS scoope have a back? As I recall these do not as you can see day-light on the sides of the scoop in one of the pics. Without a back the cut-out would not be a fabricated part of the scoop.

I'll try to take a closer look this weekend. Thanks for the guidance on accessing from inside.

Took everything apart today and got some pics. They are not perfect because the metal frame and window mechanism still get in the way a bit. Thought I might be able to take the scoop off but the bolt holding it on from the inside is very difficult to get at. As I suspected it is held on from the inside via that nocical piece sticking out from the scoop. Will post some of the pics later tonight.
 
OP
OP
F

Forsche

Well-known member
Joined
Jan 12, 2013
Messages
219
Taking a look at the brake ducts from the inside

Tore into the interior today to take a look at the brake ducts. Found some interesting stuff.

All orignal upholstery turns out to be in excellent shape:
 

Attachments

  • photo-79.JPG
    photo-79.JPG
    170.1 KB · Views: 43
  • photo-78.jpg
    photo-78.jpg
    76.3 KB · Views: 41
  • photo-77.JPG
    photo-77.JPG
    156.6 KB · Views: 42
  • photo-76.jpg
    photo-76.jpg
    80.5 KB · Views: 40
  • photo-80.jpg
    photo-80.jpg
    87.5 KB · Views: 46
Last edited:
OP
OP
F

Forsche

Well-known member
Joined
Jan 12, 2013
Messages
219
View of the brake duct installation from inside

Removed the door panel. You can see the ducting has deteriorated. Ducting is held on with collars on both end secured with Wittek hose clamps. The ducting comes through from the scoop and appears to go through a hole in the window regulator. There is a flat aluminum sheet between the two window channels and the ducting goes through a hole in that panel.

You can see a stud just above the ducting. This is the stud and nut which come through from that conical shaped portion of the scoop. The nut secures the scoop. Interestingly this stud also appears to be what is acting as the window stop when you role down the window.

Sorry but some of the photos loaded rotated. The second, third and fourth photos should be rotated right to be right-side up.
 

Attachments

  • photo-81.jpg
    photo-81.jpg
    81.1 KB · Views: 42
  • photo-82.jpg
    photo-82.jpg
    71.4 KB · Views: 43
  • photo-83.JPG
    photo-83.JPG
    153.5 KB · Views: 40
  • photo-84.jpg
    photo-84.jpg
    99.9 KB · Views: 38
  • photo-86.jpg
    photo-86.jpg
    85.3 KB · Views: 41
  • photo-87.JPG
    photo-87.JPG
    136.3 KB · Views: 43
Last edited:
OP
OP
F

Forsche

Well-known member
Joined
Jan 12, 2013
Messages
219
final few pics

You can see the stud comes through from the conical portion of the scoop and also holds the scoop on and also seems to act as the window stop.
 

Attachments

  • photo-88.jpg
    photo-88.jpg
    71.6 KB · Views: 39
  • photo-89.jpg
    photo-89.jpg
    75.5 KB · Views: 47

franklinair

Well-known member
Joined
Mar 1, 2007
Messages
4,744
The side scoop bolt/stud does not stop the 1/4 window from going all the way down (unless your application's stud is too long and protruding through the solid 1/4 window mechanism). More than likely the duct is acting as the stop if the stud is not too long.

Neil
 
Top