• Welcome to the CaliforniaSpecial.com forums! - You are currently viewing the forums as a GUEST. To take advantage of all our site features, please take a moment to join our community! It's fast, simple and absolutely free.

    If you have problems registering or can't log into your account, please contact Admin.

    Please Note: If you are an existing member and your password no longer works, click here to reset it.

1968 Heater core

Duker

Well-known member
Joined
Sep 18, 2007
Messages
73
Location
CANADA
Hi
My heater core went on me. Now I live where a 1968 Mustang with air would would be an audity to say the least and that is why I am contacting you.:wink:

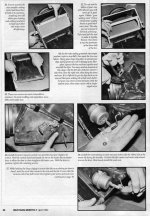
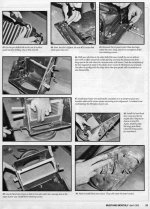
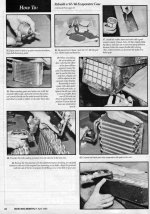
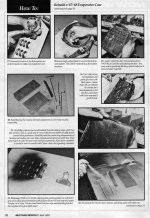
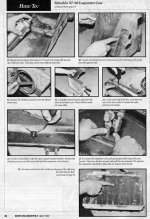
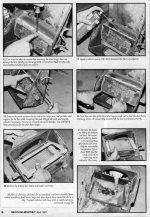
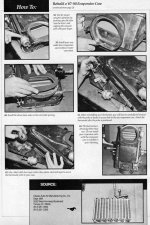
I ordered a new core with a seal kit but none of these guys have actually changed one with air. Are there any surprises or do you have any suggestions in removal or installation.

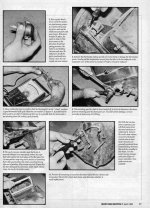
The manual doesn't even show this valve anywhere and at the fire wall the hose that goes from the "flying sauser valve":icon_lol: I call it, through the fire wall. I need that hose too, mine is the original with the clamps to boot.

Can you help please

Duker
 

Mosesatm

Well-known member
Joined
Jan 18, 2005
Messages
9,029
I just completed that project.

The valve you're talking about is probably the water control valve. Under that valve should be the expansion valve for the AC, but it may be wrapped in sticky, disgusting, tar-like tape, so you may not be able to see it.

There are 3 nuts on the engine side of the firewall, and 2 lag screws under the dash, to remove before the cases can be removed. One nut is near the hood hinge and the other 2 are near the center of the firewall. One lag screw is at the passenger side fresh air plenum, and the other one is hidden waaaayyy back under the dash, near the speaker, behind the blower motor, way up high. Good luck reaching that one. I finally used a 1/4" drive socket on every extension I had.

Be sure to unscrew the nuts from the engine side of the firewall before you unscrew the lag screws under the dash, and place something under the cases to support them when you remove the lag screws.

I can post photos if you want to know exactly where the nuts and screws are located.

Of course, you also need to remove the heater hoses, AC hoses, and the big round cover that seals around all the hose penetrations. Be sure to buy a new grommet for that area. it's not in your seal kit.

There are 2 cases or boxes inside the car. One holds the fan and the other holds the evaporator and heater core. To get them out I strongly recommend removing the front carpet, kick panels, glove box, gauge cluster, radio, and both seats.

Here's a tip; Buy some multi-colored 1/4" electrical tape and use a different color for each vacuum hose, then photograph each control valve with the taped hoses. Ford went a little vacuum-crazy in 68. Also take photos at every stage of removal. There are some electrical connections that you'll want to photograph so you get the wires back on correctly. Also photograph all the stages of box disassembly. Digital photos are free and you're better off taking way too many than not enough.

I found an article on Mustang Monthly .com that helped a little. If I can find the link I'll post it.
 

franklinair

Well-known member
Joined
Mar 1, 2007
Messages
4,744
I'm assuming you DO have factory A/C. The bad news is; you'll have to remove the entire unit from under the dash. This means you'll have to dump the freon as well. In today's world/environment, that means an A/C shop should remove & contain the freon from the system. And of course the anti freeze fluid.
A word of caution- be SURE you have the new heater core leak tested PRIOR to installation. New ones have been known to leak.
I'll get a look at mine tomorrow to refresh my memory for more specific details (also factory A/C) but you must disconnect the hot water hoses and both freon lines in the engine bay, as well as the nuts on the studs holding the heater/AC box to the firewall. Inside, (as I recall) there's a mounting screw in the extreme/upper/outboard position that supports the housing where it mates with the cowl vent inlet. The attach point at the blower motor is a slip joint, secured by 'push-in' clips.
A lot of wiggling & contorting, but it WILL come out. Tag the vacuum hoses so you know where to put them back. It's also a good time to test the vacuum valves to make sure the diaphrams are OK. (Just gently suck on them & see if they hold vacuum OK)
Wish I were there to help you (and 20 years younger!), as once you've done it, you'll NEVER forget how!

Neil

I don't remember having to remove the instrument cluster, but the glovebox, carpet, and possibly the radio (I forgot about that 2nd lag screw near the speaker) need to come out.
 
Last edited:

Mosesatm

Well-known member
Joined
Jan 18, 2005
Messages
9,029
Ah, yes, I just remembered the worst part. It was so bad I think I blocked it out.

If you replace the firewall insulation pad be sure to cut LARGE holes in it where the studs go through the firewall. LARGE HOLES. The stud is only about 1/4" thick but you'll want to cut about a 1" hole in the insulation. Did I mention they need to be LARGE HOLES?

The reason is that when you are putting the boxes back in the car they don't go straight in so you can't line up the studs with the holes in the firewall. Actually, you can't even see the holes so you have no idea where they are. That means you're going to catch the studs on the firewall pad a few times, and when everything is finally lined up the studs won't go through the holes because the pad is in the way, and this stuff is tough. When this happens the 4th or 5th time make sure the garage door is closed and/or there are no young neighborhood children within earshot. :wink:

Hopefully Neil and I don't have you too nervous about your task ahead. It's not that difficult the 2nd time, but the 1st time sucks! Just be patient and don't force anything because if you do something will break and no-one makes new evaporator boxes.

He's right about the heater cores, too. I tried bending one of the pipes on my new heater core and the solder popped loose at the base. (Hence, the 2nd time comment above). The quality of reproduction heater cores is beyond pathetic..

Here's the article. It wasn't on-line.

I'll add the last page to another post.
 

Attachments

  • 1993 April MM P16 Small.jpg
    1993 April MM P16 Small.jpg
    239.1 KB · Views: 33
  • 1993 April MM P26 Small.jpg
    1993 April MM P26 Small.jpg
    205 KB · Views: 20
  • 1993 April MM P25 Small.jpg
    1993 April MM P25 Small.jpg
    208.1 KB · Views: 27
  • 1993 April MM P24 Small.jpg
    1993 April MM P24 Small.jpg
    204.5 KB · Views: 26
  • 1993 April MM P22 Small.jpg
    1993 April MM P22 Small.jpg
    198.4 KB · Views: 21
  • 1993 April MM P20 Small.jpg
    1993 April MM P20 Small.jpg
    196.1 KB · Views: 22
  • 1993 April MM P18 Small.jpg
    1993 April MM P18 Small.jpg
    217.4 KB · Views: 28
  • 1993 April MM P17 Small.jpg
    1993 April MM P17 Small.jpg
    211.7 KB · Views: 24

Mosesatm

Well-known member
Joined
Jan 18, 2005
Messages
9,029
Here's the last page.
 

Attachments

  • 1993 April MM P30 Small.jpg
    1993 April MM P30 Small.jpg
    196.1 KB · Views: 20

Midnight Special

Well-known member
Joined
Nov 5, 2005
Messages
3,714
Location
Grass Valley, California
...I did not have to remove the AC lines, just the heater hoses, firewall insulation kick panel, glove box door and all mounting screws. The only "bear" was pulling the unit out far enough under the dash to get to the clips along the back of the housing. After that, the bottom half dropped down and I replaced the core... NO NEED to remove the instrument cluster!
 
OP
OP
D

Duker

Well-known member
Joined
Sep 18, 2007
Messages
73
Location
CANADA
HOLY CRAP!!!!!

Sounds like I may have to have a 40 oz of CC after the job is done:smile:
I am so gratefull for the help.

So we are sure we DO NOT have to drain AC? I don't want to drain the AC.:eek:

I can picture from your discriptions, having to make the holes in the insulation LARGER that makes alot of sense to me.

I will read the links, thank you. I will not have the core for a few more days, it is being shipped up.

Can you tell me the name or give me a part number for that hose I was telling you about that comes off the Water Control Valve please? The people up here had a problem with my explanation.

Cheers

Duker
 

Mosesatm

Well-known member
Joined
Jan 18, 2005
Messages
9,029
HOLY CRAP!!!!!

Sounds like I may have to have a 40 oz of CC after the job is done:smile:
I am so gratefull for the help.

So we are sure we DO NOT have to drain AC? I don't want to drain the AC.:eek:

I can picture from your discriptions, having to make the holes in the insulation LARGER that makes alot of sense to me.

I will read the links, thank you. I will not have the core for a few more days, it is being shipped up.

Can you tell me the name or give me a part number for that hose I was telling you about that comes off the Water Control Valve please? The people up here had a problem with my explanation.

Cheers

Duker

Is it Z-shaped?
 

Attachments

  • Z Hose.pdf
    302.4 KB · Views: 43
Last edited:

Mosesatm

Well-known member
Joined
Jan 18, 2005
Messages
9,029
...I did not have to remove the AC lines, just the heater hoses, firewall insulation kick panel, glove box door and all mounting screws. The only "bear" was pulling the unit out far enough under the dash to get to the clips along the back of the housing. After that, the bottom half dropped down and I replaced the core... NO NEED to remove the instrument cluster!

Please note that Tim is talking about replacing only the heater core, not cleaning and resealing the boxes. As he says, if you want to only replace the heater core you can drop the bottom of the evaporator box while it's still in the car.

If you want to reseal the boxes you need to remove the AC lines and remove the boxes from the car.

Also, if you want to do a good job on your HVAC rebuild you will most likely want to remove the vent ducts, and the defroster housing so you can clean them. Once you see the disgusting junk that's in the box you may think a good cleaning of everything is in order. At that point the gauge cluster will come into play.
 
OP
OP
D

Duker

Well-known member
Joined
Sep 18, 2007
Messages
73
Location
CANADA
Yes, it is Z shaped and thank you for the picture/part number.

Hopefully this is the part the supplier ordered from my discription.

Duker
 

Midnight Special

Well-known member
Joined
Nov 5, 2005
Messages
3,714
Location
Grass Valley, California
...Arlie is correct and my unit was already pretty clean. I did take the lower half of the box out, clean & service the linkage & check the vacuum functions. I wish now I would've inquired here as you "Duker" did before I started. Changing a core in a non-AC was a comparative cake walk. All of this great experience would've been very handy.

Thanks to all!
 
Top