• Welcome to the CaliforniaSpecial.com forums! - You are currently viewing the forums as a GUEST. To take advantage of all our site features, please take a moment to join our community! It's fast, simple and absolutely free.

    If you have problems registering or can't log into your account, please contact Admin.

    Please Note: If you are an existing member and your password no longer works, click here to reset it.

1968 Grill Rivets

lnevill

Well-known member
Joined
Jun 25, 2013
Messages
64
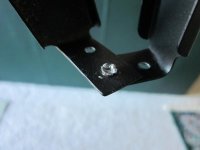
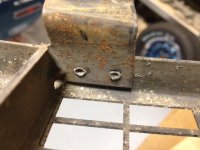
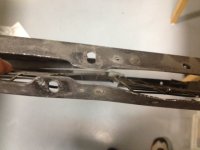
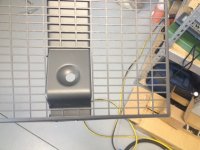
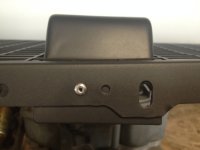
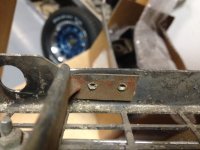
I found some tubular rivets and a peening tool at Tandy leather. I had to cut the rivet down a bit.Take a look and give me your opinions.

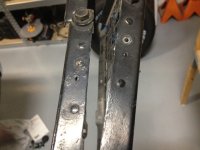
Should the heads be more "round" or "domed"?

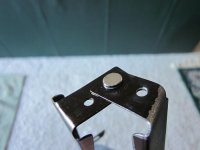
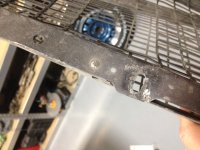
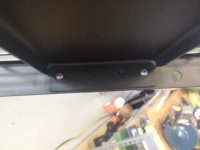
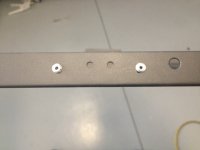
What should the backside crimp look like? Is it a rosette like this or just a bulge?

Thanks and Merry Christmas!

Lee
 

Attachments

  • rivet-back.JPG
    rivet-back.JPG
    59.9 KB · Views: 57
  • rivet-front.JPG
    rivet-front.JPG
    74.6 KB · Views: 61

Powell

Well-known member
Joined
Aug 20, 2002
Messages
204
I believe they should be more rounded than the one in your picture. Not sure what the underside should look like.
 

x-codegtcs

Well-known member
Joined
Sep 5, 2002
Messages
549
Location
Kaysville, UT
Lee - Richard's photos below look correct. The rivet is semi-tubular and so your example looks pretty correct, but maybe a bit rough. I will see if I can get a photo of a factory finished rivet for you.

Richard - Your rivets look correct, but the spacing doesn't look like my original brackets. The bottom only has one rivet and the top are spaced much wider - didn't even use the narrow bracket holes.
 
Last edited:

Mosesatm

Well-known member
Joined
Jan 18, 2005
Messages
9,036
You're right, there should be two on top, using the wide holes, and one on the bottom.
Here are some photos of an original.
 

Attachments

  • DSCN2009 (1000x797).jpg
    DSCN2009 (1000x797).jpg
    211.1 KB · Views: 55
  • DSCN1999 (1000x694).jpg
    DSCN1999 (1000x694).jpg
    182.5 KB · Views: 51

x-codegtcs

Well-known member
Joined
Sep 5, 2002
Messages
549
Location
Kaysville, UT
Here are some photos from my brackets and grille. The rivets measured approx 0.23" dia and 0.023" in height at the center of the truss.

The first set of 4 photos show my rebuilt grille with the wrong rivet type - but correct rivet placement

The next 3 show the original GTCS grill rivet head type and position

The last 3 show the factory finished look of the rivets on the bottom side of an unrestored 68 mustang grille.
 

Attachments

  • 68 Rivet Bottom1.JPG
    68 Rivet Bottom1.JPG
    126.7 KB · Views: 39
  • Original GTCS3.JPG
    Original GTCS3.JPG
    131.2 KB · Views: 39
  • Original GTCS2.JPG
    Original GTCS2.JPG
    97.5 KB · Views: 40
  • Original GTCS1.JPG
    Original GTCS1.JPG
    105.7 KB · Views: 45
  • photo 4.JPG
    photo 4.JPG
    119.9 KB · Views: 36
  • photo 1.JPG
    photo 1.JPG
    81.6 KB · Views: 36
  • photo 3.JPG
    photo 3.JPG
    95.4 KB · Views: 35
  • photo 2.JPG
    photo 2.JPG
    82 KB · Views: 36
  • 68 Rivet Bottom2.JPG
    68 Rivet Bottom2.JPG
    123.5 KB · Views: 39
  • 68 Rivet Bottom3.JPG
    68 Rivet Bottom3.JPG
    120.7 KB · Views: 38
OP
OP
lnevill

lnevill

Well-known member
Joined
Jun 25, 2013
Messages
64
All these photos help, especially the ones that show the crimp. I've ordered some new rivets from Graingers and will post new photos after my next attempt.

Lee
 

dalorzo_f

Well-known member
Joined
Jan 7, 2006
Messages
1,886
Location
Brisbane Australia
Yep, figured the repro '67 grille was not correct, but did not want the open holes where the old rivets held the brace in place so reused them. As the brackets were repros with no holes just drilled them to match.

If I had OEM brackets I would have used the correct locations and filled the holes in the repro grille....
 

dalorzo_f

Well-known member
Joined
Jan 7, 2006
Messages
1,886
Location
Brisbane Australia
You can buy them from Hansen Rivet Co

http://www.hansonrivet.com/

If you want the rivet squeezer the Tatco Hansen sells is nice,

http://www.hansonrivet.com/hand-rivet-squeezers.htm

... but the Cleaveland Aircraft one is the bees knees... really, really nice tool. Used the Tatco for a few years and now it gathers dust after buying the "Main Squeeze"

http://www.cleavelandtool.com/Main-Squeeze-model-22/productinfo/SCH22/#.Ur0vWprxvIU

Pricey, but for heater box restoration and grilles they are really nice to have.
 

x-codegtcs

Well-known member
Joined
Sep 5, 2002
Messages
549
Location
Kaysville, UT
Yep, figured the repro '67 grille was not correct, but did not want the open holes where the old rivets held the brace in place so reused them. As the brackets were repros with no holes just drilled them to match.

If I had OEM brackets I would have used the correct locations and filled the holes in the repro grille....

For future reference, the standard 67 bracket holes are left in tact - that is, not filled in and present. You can see both top holes unused in Arlie's and my photos, so no need to fill them in when/if you decide to go that route.
 
OP
OP
lnevill

lnevill

Well-known member
Joined
Jun 25, 2013
Messages
64
I was hoping to avoid paying $250+ for a tool that won't get used much and be able to come up with a technique others could use as well. I'd like to be able to send my left over rivets and a hand tool to others on the board so they too can avoid the $25 per rivet tool purchase!!

Graingers makes a hand peening tool also, but it was $65. I read someone had used a roll pin punch to begin the crimp so that will be my next approach since I already have a set of those. If that doesn't work, I'll go back to the peen from Graingers. Once I get it perfected, I'll send the extra rivets and tool to the first person on the board who asks for it, as long as he/she agrees to pass it on to the next...

The Graingers part number for the rivets I ordered is: 1HBZ7 - it's a pack of 100.

Description = Aluminum semi-tubular rivet
Head diameter= 7/32" (0.218)
Shaft diameter = 1/8"
Length = 3/16"

Thanks!
Lee
 
Last edited:

Mosesatm

Well-known member
Joined
Jan 18, 2005
Messages
9,036
Another option is to use pop rivets and fill in the holes with spot putty if you're going to paint them. If you want to leave them natural the dimples could be filled with solder as x-codegtcs mentions.
 
Last edited:

x-codegtcs

Well-known member
Joined
Sep 5, 2002
Messages
549
Location
Kaysville, UT
I was hoping to avoid paying $250+ for a tool that won't get used much and be able to come up with a technique others could use as well. I'd like to be able to send my left over rivets and a hand tool to others on the board so they too can avoid the $25 per rivet tool purchase!!

Graingers makes a hand peening tool also, but it was $65. I read someone had used a roll pin punch to begin the crimp so that will be my next approach since I already have a set of those. If that doesn't work, I'll go back to the peen from Graingers. Once I get it perfected, I'll send the extra rivets and tool to the first person on the board who asks for it, as long as he/she agrees to pass it on to the next...

The Graingers part number for the rivets I ordered is: 1HBZ7 - it's a pack of 100.

Description = Aluminum semi-tubular rivet
Head diameter= 7/32" (0.218)
Shaft diameter = 1/8"
Length = 3/16"

Thanks!
Lee

Lee - very generous of you...I may have to borrow it when it is a few generations down the road and I am bugged by my pop rivets. Maybe soldering...lol...

You would think that someone would have come out with a set of dies that can be used in a vice...it seems a simple thing to do...maybe I am missing something...
 

Powell

Well-known member
Joined
Aug 20, 2002
Messages
204
I actually made a tool from a C-clamp with a ball bearing brazed to one jaw and a relief partial hole drilled in the other jaw.
 
Top