• Welcome to the CaliforniaSpecial.com forums! - You are currently viewing the forums as a GUEST. To take advantage of all our site features, please take a moment to join our community! It's fast, simple and absolutely free.

    If you have problems registering or can't log into your account, please contact Admin.

    Please Note: If you are an existing member and your password no longer works, click here to reset it.

1968 tach wiring help

retroman99

Well-known member
Joined
Mar 15, 2003
Messages
190
Location
Redondo Beach, CA
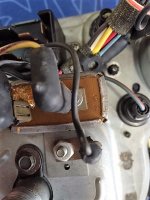
I'm trying to install the small rocketman tach where the clock goes. it needs negative from Coil which I believe I can tap into the red with green stripe wire coming from the engine gauge feed. I also need a good source for the switched positive feed and a ground which is easy. would appreciate any guidance on this. really trying to keep it as clean under the dash as possible and perform minimal damage to the new wire harnesses I have.
 

Ruppstang

Well-known member
Joined
May 22, 2009
Messages
3,034
Near the fuse block there is a yellow triple female connector that was used for things like fog lights and AC. It is un fused so you would need a inline fuse.
 

p51

Well-known member
Joined
Aug 2, 2005
Messages
1,025
Location
NorCal
I installed a Retrogauge mini-tach where the clock normally goes.

I ran a separate wire from the coil to the tach. Took it through the firewall where the speedometer cable enters.

On my car the PO had put in a connector for accessories which I used so I don't know where the best place to get keyed power is. But one idea, you can probably (?) use the same switched power line as your radio which provides power during ACC, Crank, and Run.

The gauge cluster itself is grounded through the screws holding it to the dash so it's possible just to ground the tach to the metal back of the cluster. In my case the back of the tach was metal and tach ground so just installing it in the cluster grounded it. However, you may still want to add a dedicated ground wire from the tach. I was getting some bounce in the tach so added a dedicated ground from the back of the tach to a dash metal support right behind the gauge cluster.
 

rvrtrash

Well-known member
Joined
Apr 25, 2003
Messages
3,652
The red with green stripe wire is the positive feed to the coil. The negative is a short pigtail that goes from the coil to the distributor, so you'll have to run a separate wire to the coil from the tach.

Steve
 

franklinair

Well-known member
Joined
Mar 1, 2007
Messages
4,744
I did pretty much the same:
Ran a wire from the Coil to the Tach (18 or 20 gauge, Black insulated, unobtrusive).
Grounded the Tach to the metal Instrument housing.
I picked up the 12V power on the HOT (12V) side of the IVR, which is hot when the Ign switch is in the Start, Run position.

Neil
 
OP
OP
R

retroman99

Well-known member
Joined
Mar 15, 2003
Messages
190
Location
Redondo Beach, CA
I did pretty much the same:
Ran a wire from the Coil to the Tach (18 or 20 gauge, Black insulated, unobtrusive).
Grounded the Tach to the metal Instrument housing.
I picked up the 12V power on the HOT (12V) side of the IVR, which is hot when the Ign switch is in the Start, Run position.

Neil

Thanks Neil
what is the IVR
 

franklinair

Well-known member
Joined
Mar 1, 2007
Messages
4,744
The IVR is the Instrument Voltage Regulator mounted on the back of the metal instrument housing.
It gets 12V from the Ignition Switch, puts out 6V for the instruments (Fuel, Oil Pressure, Temp gauges). (12V in, 6V out)

Neil
 
OP
OP
R

retroman99

Well-known member
Joined
Mar 15, 2003
Messages
190
Location
Redondo Beach, CA
The IVR is the Instrument Voltage Regulator mounted on the back of the metal instrument housing.
It gets 12V from the Ignition Switch, puts out 6V for the instruments (Fuel, Oil Pressure, Temp gauges). (12V in, 6V out)

Neil

Thanks Neil I looked at the back of the instrument housing there is only 1 thing that looks like a Voltage regulator mounted near where the speedometer cable attaches. this sounds like a great spot to tap into the switched 12V. do you know what side is the 12V input side? I guess I can check with a volt meter when I put power to it. I ran a 16G black wire from the coil along the gauge feed harness and re-taped it. really looks great can barely even see the wire. I ran it through the firewall with the other harness from the transmission. looks clean
thanks for the help
 

franklinair

Well-known member
Joined
Mar 1, 2007
Messages
4,744
Here's a photo of the instrument cluster showing the IVR. If you can see it, on the right side of the IVR it is embossed "Ign". That should be the 12V input. Double check with your voltmeter.

Neil
 

Attachments

  • IMG_0381.JPG
    IMG_0381.JPG
    112.7 KB · Views: 30
Top