• Welcome to the CaliforniaSpecial.com forums! - You are currently viewing the forums as a GUEST. To take advantage of all our site features, please take a moment to join our community! It's fast, simple and absolutely free.

    If you have problems registering or can't log into your account, please contact Admin.

    Please Note: If you are an existing member and your password no longer works, click here to reset it.

1968 Tail light sockets

p51

Well-known member
Joined
Aug 2, 2005
Messages
1,025
Location
NorCal
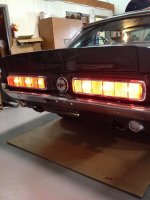
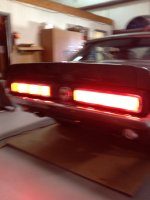
OK. Some of my tail lights are making only intermittent connection with the sockets. Looks like there is some corrosion/rust and the springs in the contacts don't seem be very "springy" anymore - one of the socket's springs is so frozen I can't even get a new bulb in.

Any suggestions on how to clean the sockets or should I just replace them?

My current strategy is to try to (1) degrease the sockets using some q-tips and simple green (2) saturate some cotton balls with vinegar/salt (to free up the rust), stick them in the sockets, and let them sit for a while.

If I replace them is this the correct part?
http://www.oreillyauto.com/site/c/d...ck=Search_01915_1331963_-1&pt=01915&ppt=C0243
 

stangfan

Well-known member
Joined
Jun 12, 2012
Messages
1,845
Location
Victoria BC Canada
I've had this issue on previous Mustangs and the GT/CS. I've had great success with shooting some WD-40 into the socket (using the straw) and then working the spring by pushing on the contact plate with a screwdriver. Sometimes it takes more than one application, but it usually frees the spring up enough to give you better contact.
 
OP
OP
p51

p51

Well-known member
Joined
Aug 2, 2005
Messages
1,025
Location
NorCal

robert campbell

Well-known member
Joined
Apr 10, 2007
Messages
4,321
I was able to source new sockets through my local Napa. When I did my restoration, I soldered a ground wire to each socket body to ensure firm grounds. They are all connected together near my gas filler as stock. Good grounds, great lights!!!

By the way, time for Led bulbs also. Less draw, way brighter, and much easier on your blinker switch! Now is the time!

Rob
 
OP
OP
p51

p51

Well-known member
Joined
Aug 2, 2005
Messages
1,025
Location
NorCal
Might I suggest "Plasma LED" tail lights?

That's exactly what got me started along this path...

With all the good reviews, I bought some of these for the 'stang and was in process of replacing my tail light bulbs when I ran into the problem with the sockets. That's one of the "interesting" things about owning a classic car... you start doing one simple thing... and you end up with a much bigger project than you expected :rolleyes:

Scott, just an aside, when I ordered the bulbs on-line from West Coast Classic Cougar and went straight to "checkout" after selecting the bulbs, it wanted to charge me $50 for crating/shipping!! :eek: I futzed around and instead of going straight to checkout, I went to "cart" first, then to "checkout" and got the correct first class postage of ~$5. There seems to be some bug in the on-line ordering. You should let someone know (you work there, right?)... you guys are probably losing some sales when people come across a $50 charge for shipping.

James
 
OP
OP
p51

p51

Well-known member
Joined
Aug 2, 2005
Messages
1,025
Location
NorCal
Neil, thanks for the heads up. Before purchasing I read a number of reviews of these bulbs. From what I gathered it seems some folks needed a new flasher, some didn't. I had an older version of LEDs installed previously which used the old flasher so I'm hoping I don't need a new flasher with these new LEDs.

Rob, better grounding for the sockets is a great suggestion.

Aside: The main reason I'm upgrading is safety. Anything that makes the car more visible helps and, according to reviews, these bulbs are significantly brighter than older LED bulbs.

James
 

franklinair

Well-known member
Joined
Mar 1, 2007
Messages
4,744
They Are BRIGHT! (I did have to purchase the solid state type flasher).
Tail lights & Brake lights.

Neil
 

Attachments

  • 065.jpg
    065.jpg
    86 KB · Views: 18
  • 066.jpg
    066.jpg
    57.1 KB · Views: 22
OP
OP
p51

p51

Well-known member
Joined
Aug 2, 2005
Messages
1,025
Location
NorCal
They Are BRIGHT!

Wow! Pretty sure that will get people's attention - especially those folks chatting/texting on their cellphones. Now I've just got to hope they don't rear end me after being temporarily blinded :cool:
 
OP
OP
p51

p51

Well-known member
Joined
Aug 2, 2005
Messages
1,025
Location
NorCal
OK, guys-n-gals... got a question.

Just got my new tail light sockets. Based on Rob's suggestion I got the 3-wire version that has a dedicated ground wire in addition to the two "contact wires". The contact wires are both the same color so...

...here is my question:
For the two contact wires does it matter which one hooks to the regular lights circuit and which one hooks to the blinker circuit? (I'm assuming no, but want to check for sure)
 

rvrtrash

Well-known member
Joined
Apr 25, 2003
Messages
3,652
It does matter because one filament of your bulb is a different resistance, and brighter, than the other. You'll want to check the orientation of the pin reliefs in the socket and make sure you hook the wires the same as the old ones.

Steve
 

franklinair

Well-known member
Joined
Mar 1, 2007
Messages
4,744
+1. One wire for the lower intensity tail lite filament, one wire for the brake lite filament.

Neil
 
OP
OP
p51

p51

Well-known member
Joined
Aug 2, 2005
Messages
1,025
Location
NorCal
Wow! Good thing I asked. Thanks much for the quick responses. Cheers!
James
 
OP
OP
p51

p51

Well-known member
Joined
Aug 2, 2005
Messages
1,025
Location
NorCal
One more question for anyone who has replaced the tail light sockets...

The original sockets were press-fitted into the buckets. They fit very tight and were a pain to get out. The replacements are looser so, although easy to install, they now rotate (and push in) when trying to insert a bulb. So the question is: How did you secure the sockets in the bucket?
 

rvrtrash

Well-known member
Joined
Apr 25, 2003
Messages
3,652
What I did was scuff up the outside of the socket and built up a thin layer of solder on it, to increase the outside diameter.

Steve
 
OP
OP
p51

p51

Well-known member
Joined
Aug 2, 2005
Messages
1,025
Location
NorCal
What I did was scuff up the outside of the socket and built up a thin layer of solder on it, to increase the outside diameter.

Steve

Steve, thanks. I hadn't thought of the that solution...
James
 

dalorzo_f

Well-known member
Joined
Jan 7, 2006
Messages
1,886
Location
Brisbane Australia
The ones I used had a inner press in clip. Socket from the rear, press in clip on the inside. A deep socket and firm support on the backside to press the clip in to hold the socket.

Solder may be an option if you don't have the press in rings. Or maybe you could expand the socket a bit somehow...
 

Ruppstang

Well-known member
Joined
May 22, 2009
Messages
3,037
A wrap or two of aluminum tape may work. I have used the clips and used epoxy to set them too.
 
OP
OP
p51

p51

Well-known member
Joined
Aug 2, 2005
Messages
1,025
Location
NorCal
Guys, thanks for all the suggestions.

From what I can tell the previous owner used some sort of silicon sealant (blue-ish) to hold the sockets in place. So, in a similar fashion I plan on using "Goop" (which is half way between a silicon sealant and super glue) to hold the sockets in place. But I am not putting it directly on the mating surfaces but rather around the socket where it goes through the bucket - to create sort of a mold/gasket around the sockets but one that is also attached to the back of the bucket. The idea is that it should hold the sockets in place but be easy to cut away if required. I'll let you know how it turns out... fingers crossed...
 
Top