• Welcome to the CaliforniaSpecial.com forums! - You are currently viewing the forums as a GUEST. To take advantage of all our site features, please take a moment to join our community! It's fast, simple and absolutely free.

    If you have problems registering or can't log into your account, please contact Admin.

    Please Note: If you are an existing member and your password no longer works, click here to reset it.

Everybody's favorite recipes?

GT/CS S Code

Well-known member
Joined
Dec 26, 2007
Messages
912
Location
Victoria, B.C., Canada
OK, it seems like we needed to start a "favorite recipes" thread so that we can share a few culinary delights (especially this time of year), so here are a few to start things off.
:cool:
My wife Laurie is originally from Selkirk, Manitoba and is Metis, so I have a few native Metis recipes that we like to cook from time to time. The traditional Metis "fry bread" or Bannock was a staple on the frontier in the 1800's. This is the best version that I have found to date (even though it is baked and not fried), and I usually make a double batch (2 loaves) or there isn't enough to go around!
:wink:

Best Métis Bannock

Preheat your oven to 375 or 400 degrees (ovens vary), and while you're waiting assemble the following ingredients.

Dry ingredients

2 1/2 cups of white flour

6 tsp of baking powder

1/2 tsp salt

2 tbsp sugar

1/3 cup of any suitable shortening (lard, bacon fat, margarine, etc.)

Wet ingredients

2 large eggs

1 cup of sweet milk

Combine first four dry ingredients and mix very well. Add whichever shortening you'll be using to the dry mix and use a pastry blender to blend until the mix forms fine well mixed crumbs. Combine the 2 eggs with the milk and mix well (I do it right in the measuring cup), then add to the flour mixture. Stir with a spatula to form a soft dough, and kneed as little as possible after placing the dough on a hard surface dusted with bench flour. Add a bit more bench flour if needed to form a soft or "satin" looking and feeling dough that is no longer sticky to the touch. Form the dough into a rough square or rectangular loaf and place on a baking sheet or in a suitable size baking pan. Parchment paper placed underneath the loaf will help to prevent scorching on the bottom. Using a fork, prick holes onto the entire top of the loaf. Bake on an upper rack, well off the oven element, for about 20 minutes or until lightly browned on top.


Best Metis Cinnamon Rolls

To make Cinnamon Rolls, use the same dough recipe as above, but add an extra two tbsp of sugar to the dry mix. Roll out the finished dough to about 1/4" thick to form a large rectangle. Dust the surface with cinnamon, brown sugar, raisins or currents. (I sometimes add Nutmeg as well.) Drizzle a bit of corn syrup or honey back and forth across the top of the dough, and then roll up the dough, sealing the end "flaps" shut. Using a sharp knife, cut slices about 1 ½” to 2” thick from the rolled up dough and place them onto parchment paper on a cookie sheet or in a baking pan. Again, baking for 20 to 25 minutes at 375 to 400 degrees yields a batch of tasty home made cake style cinnamon buns.

Note: When I use currants with this recipe, I soak them in warm water to swell them up, then add the flavoured drained water to the milk/egg mix for a bit of extra flavour in the dough. I also add a Tablespoon of vanilla for extra flavour. Just keep adding bench flour to the wet mix until the dough is no longer sticky and has a "satin" look and feel to it before you roll it out and add the inside ingredients.


Best Metis Double Chocolate Rolls

To make Double Chocolate Rolls, add 4 heaping Tablespoons of Fry’s Cocoa powder to the dry mixture, roll out as normal, drizzle with corn syrup or honey, and substitute a layer of chocolate chips instead of the cinnamon and raisins

... another favorite French Metis food dish is "Tortiere", which is a spiced meat pie, and it's often made during the Christmas holidays when friends come to visit.

TORTIERE Recipe

3/4 lb ground pork (or substitute ground bear)
3/4 lb ground venison (moose or deer)
Small minced onion
2 large potatoes (grated)
2 large carrots (grated)
1/2 cup boiling water
1 clove garlic chopped
1.5 tsp salt
1/4 tsp nutmeg
1/4 tsp ground black pepper
1/4 tsp sage
1/4 tsp cloves

Brown meat, add water and spices. Simmer. Add potatos and carrots,
and cook about 45 minutes. Pour into pie crust with top and bake for 10 min at 450 degrees F, then reduce the temperature to 350 degrees and bake for 30-40 minutes.

Tourtiere (version #2)

Pastry: 5 cups of flour, 2 teaspoons of salt, 4 teaspoons of baking powder, 1 lb of lard, 1 cup of hot water, 4 teaspoons of vinegar, 1 well-beaten egg.

Measure flour, salt and baking powder into large bowl. Stir together to distribute all ingredients. Add lard. Cut into pieces with knife. With pastry cutter, cut in lard until whole mixture is crumbly. Mix hot water, vinegar and well-beaten egg together. Pour slowly over flour mixture stirring with fork to distribute. With your hands, work until it holds nicely together.

Filling: 5 lbs of ground pork, 2 lbs of lean ground beef, 6 medium onions, salt and pepper to taste, and 3 garlic cloves Place all ingredients into extra large saucepan. Add water to cover about 3/4 of the meat mixture. Bring to a boil and simmer for approximately 30 minutes. Stir occasionally. Cool slightly.

Line pie plates with pastry. Fill with meat mixture. Dampen outer edge with water. Cover with pastry top (make slits in top crust). Press edges to seal. Bake in 350 F oven until golden brown. These freeze well and may be left in the freezer for 4-5 months. This recipe makes approximately 7 pies.

... and a great condiment for Tortiere pies would be ...

Indian Relish

12 large tomatoes, 12 large apples, 9 medium onions, 3 cups sugar, 1 pint vinegar, 1 tsp. Pepper, ½ tsp. Celery salt, ½ tsp. Cloves, 1 tsp cinnamon, (and any other spices you prefer) and ½ cup of salt. Blend all ingredients. Cook until thick. Seal in sterile jars.

Best of the Christmas season to everyone! Start cooking and be happy! (The rest of your families will be ...)

So how about you post your favorite recipes here to share with the rest of us?
 
OP
OP
GT/CS S Code

GT/CS S Code

Well-known member
Joined
Dec 26, 2007
Messages
912
Location
Victoria, B.C., Canada
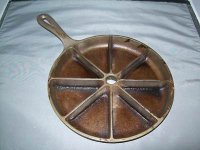
OK, here's another favorite of mine that we make often. I love old style traditional yellow cornbread, and this is the best recipe for it that I've found to date! The secret to awesome cornbread is to bake it in cast iron, and I bought special Lodge cast iron cornbread pans that are pre-segmented into 8 sections that make the BEST crispy cornbread you ever tasted!
:cool:

THE ULTIMATE CORNBREAD RECIPE

Dry Ingredients:

- 1 Cup of All Purpose Unbleached White Flour

- 3/4 Cup of yellow cornmeal

- 1 Tablespoon Baking Powder

- 1 Teaspoon of salt

- 4 Tablespoons of sugar

Wet Ingredients:

- 3/4 Cup of Buttermilk

- 1/4 Cup of Whole Milk

- 2 Eggs, beaten

- 1/3 Cup of melted Butter or Margarine (I usually substitute with regular cooking oil)

Preheat your oven to 375 degrees. Spray two 9" aluminum pie pans with Pam (or with cooking oil if you have a pump sprayer like we do). Cast iron is the best, and a skillet or segmented cornbread pan is the very best way to cook cornbread properly.

In a large mixing bowl, combine all the dry ingredients and blend them well. In a smaller bowl or measuring cup, thoroughly mix the buttermilk, whole milk, eggs, and oil or melted margarine. Pour the liquid ingredients into the dry ingredients and mix well. Pour the batter into the two pie pans evenly and place in the preheated 375 degree oven for 25 to 30 minutes.

When the cornbread is done, place on a cooling rack for about 5 minutes, then place a plate on the top and flip it over so that the cornbread is inverted on the plate. Cut into pie shaped wedges and spread with butter or margarine while it's still warm. It's great plain with Butter or Margarine, or topped with Apple Butter or any type of Jam. If any of it survives until the next morning, it's great for breakfast toasted until crispy under the oven broiler.

Important Tips:

- Have all of the ingredients at room temperature.

- Stone ground cornmeal works best and gives a golden coloured bread.

- If using melted margarine in the wet ingredients, don't use "no fat" versions as they contain too much water.

- Mix the batter until completely smooth. I don't care what your Grandmother said about lumpy batter being OK!
 

Attachments

  • Lodge cast iron cornbread pan.jpg
    Lodge cast iron cornbread pan.jpg
    16.1 KB · Views: 37
OP
OP
GT/CS S Code

GT/CS S Code

Well-known member
Joined
Dec 26, 2007
Messages
912
Location
Victoria, B.C., Canada
Another favorite of mine are fresh, hot buttermilk biscuits! When we go Cowboy Action Shooting, my alias is "Reverend Al", and I'm often the "camp cook" and prepare hot lunches for the shooters at our matches. Heck, they have to be good or I wouldn't want to serve them to a bunch of armed and hungry cowboys and cowgirls! These are "Reverend Al's" BEST buttermilk biscuits ...

The Reverend Al’s Homemade Buttermilk Biscuits


3 cups of all purpose flour
3 teaspoons of baking powder
1 teaspoon of salt
¾ teaspoon of baking soda
1 tablespoon of Garlic powder (optional)

¾ cup of any suitable type of shortening (such as Crisco, bacon grease, lard, margarine, etc.)

1 cup of grated cheese (Cheddar or your choice of mixed cheeses)

1 cup of buttermilk

Pre-heat oven to about 375 degrees.

Sift the flour to make sure that there are no lumps. Add the baking powder, salt, baking soda, and Garlic powder if you’re using it. Mix the dry ingredients well. (I use a pastry blender to stir the dry ingredients in the bowl until they’re all well blended.) Add the shortening and work it into the dry ingredients with a pastry blender until the entire mix resembles coarse cornmeal. Add the grated cheese and mix well again.

Next, add the buttermilk, working it into the mixture with a large, solid spoon. After everything is thoroughly mixed, roll it out onto a floured board or counter top. Knead the dough as little as possible, adding more flour if it’s too wet, or a bit more buttermilk if it’s too dry, until the dough doesn’t stick to your hands, and has a “satin” look to it.

After it has the right consistency, roll or pat out the dough to about ¾” thick, and cut out the biscuits with a 2” to 3” biscuit cutter, or if in camp use the end of a soup can with the top and bottom cut out. If you lightly flour the end of the biscuit cutter or soup can as you cut them, the biscuits won’t stick to your cutter plus they will rise in layers as they bake, yielding a nice, light and fluffy style of biscuit.

I use a flat cookie sheet for baking biscuits and use baking parchment paper or silicon baking sheets on the bottom of the cookie sheets to prevent the biscuits from burning on their bottoms.

In our oven about 10 to 12 minutes is just about right for light, medium browned biscuits. If they are too dry in the middle, bake for a slightly shorter time, as they should be slightly moist in the centre when finished.
 

Ruppstang

Well-known member
Joined
May 22, 2009
Messages
3,080
My favorite recepie for fun
1 whole Saturday off
1 or 2 old Mustangs
1 warm shop
A freshly delivered box of Mustang parts
A son or a good friend who shares your passion
A wife on a shoping trip
1 cooler full of cold drinks
Mix well with some storys (some true)
Serves 1-3 a day full of FUN!
 

Attachments

  • 1964 coupe 006.jpg
    1964 coupe 006.jpg
    92.1 KB · Views: 37
  • 1964 coupe 019.jpg
    1964 coupe 019.jpg
    103.1 KB · Views: 42
Last edited:
OP
OP
GT/CS S Code

GT/CS S Code

Well-known member
Joined
Dec 26, 2007
Messages
912
Location
Victoria, B.C., Canada
I totally agree!

I'm definitely going to add that one to my favorite recipe book!
:grin:
 

Attachments

  • 68 Mustang pickup 10.jpg
    68 Mustang pickup 10.jpg
    58.4 KB · Views: 36
  • Driveway rebuild.jpg
    Driveway rebuild.jpg
    91.8 KB · Views: 48
  • IMG_1385.JPG
    IMG_1385.JPG
    212.7 KB · Views: 43
  • IMG_1364 resized.jpg
    IMG_1364 resized.jpg
    78.4 KB · Views: 41
  • IMG_1366 resized.jpg
    IMG_1366 resized.jpg
    83.9 KB · Views: 37
  • IMG_1356.JPG
    IMG_1356.JPG
    236.8 KB · Views: 42
OP
OP
GT/CS S Code

GT/CS S Code

Well-known member
Joined
Dec 26, 2007
Messages
912
Location
Victoria, B.C., Canada
Christmas Cookies ...

All kidding aside, and since it is the Christmas season, here is a new recipe that we got from one of my wife's girlfriends. They are awesome if you love the taste of ginger!
:cool:

Double Ginger Crackle Cookies

Pre heat your oven to 350 degrees

Ingredients

¾ cup of Shortening
½ cup of Brown Sugar (firmly packed)
½ cup of White Sugar

2 Tblsp of Molasses
1 egg
1 tsp of finely grated Lemon peel

2 cups of Flour
2 tsp of Baking Soda
2 tsp of ground Ginger
½ tsp of ground Cinnamon
½ tsp Salt
¼ cup (4 or more slices) of crystallized Ginger finely chopped

¼ cup of White Sugar for topping

Preparation

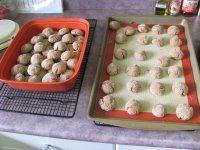
Beat shortening, brown sugar, and ½ cup of white sugar until smooth. Add the molasses, egg, and lemon peel and beat again until smooth. Add the dry ingredients and mix until well blended. Place remaining ¼ cup of white sugar into a shallow bowl, form dough into small balls (about ¾” to 1” in diameter), and then roll them in the sugar until coated all over. Place on parchment paper or silicon baking sheets about 2” apart. Bake for 10 minutes or until golden brown and tops have crackled.

Makes about 4 dozen cookies.
 

Attachments

  • Ginger Crinkle Cookies 001.jpg
    Ginger Crinkle Cookies 001.jpg
    78 KB · Views: 32
  • Ginger Crinkle Cookies 002.jpg
    Ginger Crinkle Cookies 002.jpg
    209.7 KB · Views: 49
  • Ginger Crinkle Cookies 003.jpg
    Ginger Crinkle Cookies 003.jpg
    222.8 KB · Views: 38

PonyGal

Well-known member
Joined
Dec 14, 2006
Messages
556
Location
Loomis, Ca
Okay. After spendinging the past week with hugh work projects and all weekend cleaning and decorating for Christmas, I finally have a few minutes to add to this thread. This is one of my standard recipies that I make whenever the family is spending time with me. It is so easy and everyone just LOVES it!!

Breakfast Casserole

1 16 oz package of Jimmy Dean pork sausage (I use the low fat)
1 onion chopped
5-6 mushrooms chopped
5 eggs lightly beaten plus 1 cup egg beaters
2 cups low fat milk
salt and pepper to taste
2 cups shredded cheddar cheese
6-8 cups torn bread (sourdough tastes best)

Cook sausage crumbling it as it cooks. Drain off any fat. Add chopped onion and mushrooms and saute until cooked.

In large mixing bowl, combine eggs, egg beaters, milk, salt & pepper, and half of the cheese.

Spray a 13x9x2 baking dish with Pam and add torn bread to the dish. Pour egg mixture over the bread and sprinkle the rest of the cheese on top. You can then sprinkle either paprika or parsley on top for decoration.

At this point you can cover the casserole with foil and put it in the fridge over night to soak up all the moisture, or you can put it in the oven to bake (I always make it the night before).

Preheat oven to 325 degrees. Bake covered with foil for 30-40 minutes and then uncover and continue baking for 15 minutes more or until egg mixture is set and top of casserole is browned (50-60 inutes total).

This goes so fast at my house that I hardly get a chance to get some for myself!!
 

Diesel Donna

Well-known member
Joined
Dec 22, 2004
Messages
2,007
Oh I WISH I really could...I've been working every weekend! Just sounds like a yummy road trip to me.
 

hookedtrout

Well-known member
Joined
Mar 28, 2003
Messages
1,929
Location
Idaho
I don't have the recipe but the facility managers daughter made some Oreo Bon Bon looking things that were wayyyyyyyyyy good. I could ask for the recipe I guess. I had to leave before I ate the whole bowl full.
 
OP
OP
GT/CS S Code

GT/CS S Code

Well-known member
Joined
Dec 26, 2007
Messages
912
Location
Victoria, B.C., Canada
Another family favorite ...

Laurie's family back in Manitoba has some Ukrainian roots as well as Scotch Metis history, and this is another one of their favorite family recipes. We've made these several times and they are tasty! Best thing is to make the meat balls and then simmer them in the BBQ sauce for several hours. I simmer them and then put them into the freezer in containers right in the BBQ sauce and just thaw and re-heat them as needed. Try these and I'm sure you won't be disappointed!

Laurie’s Family recipe for Meat Balls with homemade BBQ Sauce

The Meatballs

2 lbs. hamburger
diced onions
bread crumbs
2 eggs
Form into small meatballs and fry until browned.

The BBQ Sauce

1 cup water
1 cup of Catsup
1 tsp. salt
2 tbsp. Worchester Sauce
¼ cup of White Vinegar
½ cup of White Sugar
a pinch of Cayenne Pepper

Bring sauce to a boil, then add the cooked meatballs and simmer.
 

Mosesatm

Well-known member
Joined
Jan 18, 2005
Messages
9,178
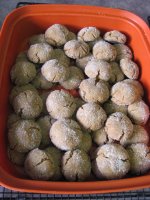
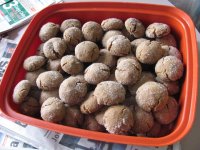
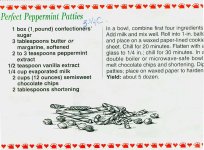
Here's another one that is seriously addictive. Keep them in the freezer.
 

Attachments

  • Peppermint Patties Picture.jpg
    Peppermint Patties Picture.jpg
    110.1 KB · Views: 41
  • Peppermint Patties Recipe.jpg
    Peppermint Patties Recipe.jpg
    120.2 KB · Views: 33

hookedtrout

Well-known member
Joined
Mar 28, 2003
Messages
1,929
Location
Idaho
Ok, here it is and I'm here to tell you they are yummy!!

Oreo Truffles

• 1 package single stuffed (regular) Oreo cookies
o Can substitute mint Oreos, but it takes more ground cookies to dry up the mix
• 1 package Philadelphia Brand cream cheese
• 1 package vanilla flavored almond bark

1. Crush Oreos finely – can use a blender/Cuisinart
2. Melt cream cheese
3. Mix Oreos and cream cheese and hand form into bite-size balls
4. Dip in melted almond bark, remove with fork or something that lets the chocolate drain off, place on waxed paper until firm.

For clarification the reference to letting the chocolate drain off is the Almond Bark which is considered an artificial chocolate. Enjoy.
 
Last edited:
OP
OP
GT/CS S Code

GT/CS S Code

Well-known member
Joined
Dec 26, 2007
Messages
912
Location
Victoria, B.C., Canada
Canadian Cowboy Beans

This is another favorite of ours and I often make these for our Cowboy Action Shooting match lunches. They've never failed to get rave reviews! For larger batches just double or triple the recipe ...

Canadian Cowboy Beans

1 pound or so of soaked, boiled, and pre-prepared white pinto beans (or a mix of beans, your choice). Prepare them by soaking the beans covered in water overnight, drain and rinse several times next morning, then cover with fresh water and bring beans to a full boil for about 10 minutes, then reduce heat and simmer for at least three hours until the beans are just tender. Drain off the water and hold the beans aside while you prepare the rest of the ingredients.

½ pound of bacon diced
2 cups of chopped onions
1 teaspoon of chili powder
1 teaspoon of “Creole” seasoning (whatever your favorite brand)
1 ½ teaspoons of salt
½ teaspoon of ground black pepper
4 to 6 cloves of minced garlic (I use 6 of course!)
1 large can of chopped tomatoes c/w the juice
1 (12 ounce) bottle of lager or ale
½ cup of Maple syrup
½ cup of packed brown sugar
½ cup of chicken stock
½ cup of Canadian rye whiskey
2 tablespoons of whole grain mustard
1 tablespoon of Worcestershire sauce
2 bay leaves

In a large pot, cook the bacon over medium high heat until brown and fat is rendered, about 6 minutes. Remove with a slotted spoon and drain on paper towels. To the fat in the pan, add the onions, chili powder, Creole seasoning, salt and pepper, and cook stirring often until the onion is soft and clear, about 4 minutes. Add the minced garlic and cook for another minute, then add the tomatoes with their juice and cook a further 2 minutes or so. It’s not listed in the recipe, but I also add about 2 to 3 diced bell peppers to the mix as well.

Add the beer, maple syrup, sugar, chicken stock, whiskey, mustard, Worcestershire and the 2 bay leaves. Stir it all very well and cook for 1 to 2 minutes, then add the cooked, previously prepared beans to it all and bring to a boil. Add the bacon pieces that you removed earlier. Reduce the heat and simmer covered for about 1 hour, stirring occasionally. Then remove the lid and continue to simmer until all is tender, about 1 ½ to 2 hours more, stirring occasionally adding a bit more water or chicken stock as needed to keep the beans covered. At the end, I thicken the bean mixture by bringing them to a boil again and adding 6 to 8 tablespoons of Masa Harena corn flour thoroughly mixed with some cold water.

If you can be patient enough, they’re even better if they are made a day in advance, left overnight to cool and thicken, and then re-heated to be served the next day. Just like stews, they taste WAY better on the 2nd or 3rd day after all the flavours mix, rather than on the day they are first made …..
 
OP
OP
GT/CS S Code

GT/CS S Code

Well-known member
Joined
Dec 26, 2007
Messages
912
Location
Victoria, B.C., Canada
North West Sourdough ...

My grandfather John Bradstock was an amazing man that moved to Canada from England at a young age, worked hard all his life, raised a family, and lived to a ripe old age of 94 years. Unfortunately, my grandmother passed away many years before him, and he was left to fend for himself as he never re-married. He was a very good cook and had a large list of favorite recipes, some from his British roots and some from the Canadian West. He always had a batch of homemade sourdough starter on the go, and my family got some of that starter from him many years ago and I still have a pot of it (from that same original batch!) going in my kitchen today. Sourdough gives great flavour to breads and biscuits, and this is my version of our favorite sourdough biscuit dedicated to my grandfather ...
(If you don't have a recipe to make your own batch of sourdough starter, I'll include the info on how to make some of your own a bit further down the page.)


The "BRADSTOCK" SOURDOUGH Biscuit

Dry Ingredients

- 4 1/2 cups of sifted flour in total, using 2 1/4 cups of Whole Wheat flour & 2 1/4 cups of Yellow Corn flour. (Important Note: Corn flour not Cornmeal, cornmeal is a bit too coarse for this biscuit recipe!)
- 3 tsp. baking powder
- 2 tsp. baking soda
- 1 tsp. salt (plus an optional 1 to 1 & 1/2 tsp. of Garlic powder if you like it as much as I do.)

Wet Ingredients

- 1/4 cup of cooking oil (or butter or margarine if you prefer the dough to be a bit more "short".)
- 1 & 1/2 to 2 cups of "Bradstock" sourdough starter
- 225 ml of "No Fat" (or regular) sour cream (1/2 of a 450ml container, save the rest for the next batch or better yet, just double everything and make a bigger batch ….)
- two large eggs
- some melted butter or margarine (to brush on top of the biscuits before cooking.)

Preparation & Cooking

Sift the dry ingredients together in a large bowl until well mixed. Combine cooking oil (or butter or margarine) with sourdough starter and eggs, (I do it right in the measuring cup). Mix wet ingredients thoroughly, then add to the dry ingredients. Mix all of the ingredients well, then turn the slightly wet ball of dough out onto a lightly floured board or work counter covered with bench flour and knead it gently for about 2 to 3 minutes. When you're finished, it should have a "satin" look and feel to it. (If it still seems a bit too wet, then gradually add a little more bench flour until it feels right)

Roll the dough out until it's about 3/4" thick. Cut out biscuits with about a 2 1/2" cutter (or with the floured end of an empty bean or soup tin if you're in camp). Place the biscuits into a lightly greased baking pan or cookie sheet. Brush the tops with the melted butter or margarine. Let rise 1 full hour in a warm place. Bake in a medium hot oven (about 325 to 350 degrees) for 15 to 18 minutes, or until nicely browned on top. You might want to experiment slighty with the cooking time, as I find that the biscuits dry out too much if over-cooked. They're much tastier if left slightly moist when finished.

The quantities listed above for a single batch makes about 12 to 16 biscuits depending how thick you roll the dough.


SURE- FIRE SOURDOUGH STARTER (from scratch)

If you're lucky enough that someone gives you a cup or so of starter that they've already been using successfully, then just follow the directions from day two on to "feed" and replenish the starter. If not, then you can start your own by following the directions below.

On the first day start by assembling:

- 1 tsp. sugar
- 2 cups warm water
- 1 small package active dry yeast (or 2 to 21/2 tsp from a bulk package)
- 2 cups of flour

Dissolve the sugar in 1/2 cup of the warm water in a large size container (a large size plastic ice cream container with a couple of holes punched in the lid is what we use). Sprinkle the yeast into the water. Let stand 10 minutes. Stir in the remaining warm water and the flour. Beat until smooth. Cover the sourdough starter tightly with a snap-on lid or plastic wrap (make sure that you poke a vent hole or two in it!) and leave it overnight at room temperature.

On the 2nd day "feed" it the following:
- 1 cup flour
- 1 cup milk
- 1/2 cup sugar
Stir until smooth, re-cover and place in refrigerator.

On the 3rd day, stir until smooth and put back in fridge.
On the 4th day, stir until smooth and put back in fridge.
On the 5th day, "feed" it again, using the same as on the 2nd day.

From day 6 to day 10 stir well until smooth once each day. It's ready to use anytime now after day 10. Sourdough starter keeps indefinitely, as long as you remember to take it out of the fridge and stir it well about once or twice a week.

When you get down to the last cup of your starter, "feed" it the same as the 2nd day and then repeat the procedure from day 3 to day 10 to replenish it.

If you want to use the sourdough starter sooner, then just leave the sourdough container out at room temperature after you "feed it" and it will "work" much faster and will be ready for use daily. (You just have to remember to stir it at least once or twice daily if you leave it out of the refrigerator as it does "grow" very quickly at room temperature, and make sure that the container is large enough to allow for it's growth ….). The longer sourdough starter is left before use, the "tangier" it becomes and is much more flavourful in the finished baked goods. If left, it often will have a clear liquid appear on the surface. This is normal, so just stir it very thoroughly and mix well before use. When left out at room temperature rather than in the fridge, it will grow in volume much faster and become much lighter with many air bubbles in the mix. This was called a "sourdough sponge", and is the traditional style of sourdough used by the pioneers for their day to day cooking needs.


A BIT OF SOURDOUGH HISTORY

Traditionally, the original pioneer "sourdoughs" would just mix equal parts of milk, flour, and sugar in a crock, and then leave it out in the open in the cabin. The free yeast cells from the air would start the mix working within a few days. They just kept stirring the mix a few times per day until it started working on it's own and then "feed" it from there. A nearby generous neighbour might give them a bit of their starter to get them going if they were lucky.

Often, the pioneer's sourdough crock was traditionally placed in a niche specifically built into the chimney inside the cabin right behind the stove to ensure that the "sponge" would remain warm and grow daily. Sourdough is a very high source of protein, and was a critical component of a pioneer's sparse diet. It was used to make a variety of foods such as pancakes, bread, biscuits, and dumplings, which were eaten along with whatever else was fortunate enough to be on the table for that day's meal.

Just a small note of interest for your enlightenment. Most people have seen a depiction of a pioneer covered wagon travelling the western trails with a large barrel hanging from the outside and have mistakenly assumed that this was a water barrel. In fact this exterior barrel was generally the sourdough crock, kept on the exterior of the wagon so that the heat of the day would keep it warm and continue to make the sourdough "sponge" grow. The crucial fresh water barrel for drinking and cooking purposes was generally kept inside the wagon, under cover, to protect it from contamination and especially from evaporation in the heat of the day.

As an interesting aside, you will note that when a batch of starter has been stored for a while, a clear but vile and noxious smelling liquid will rise to the surface. Its alcohol content is considerable, but it's odour and taste is downright awful! However , the "sourdoughs" revered this potent potable and called it "Hooch". I suspect that it added greatly to the rowdiness of the frontier.

Legend states that one "Frenchy Le Toque", a solitary trapper, had saved his "Hooch" until he had nearly a jugful. Mushing into a mining camp one day he spied a "Cheechako" or greenhorn fresh up from the south. Striding up to the stranger, his jug of "Hooch" in one hand and his double-barreled scattergun in the other, he said "Here Kid, have a drink!" The kid accepted the jug, pulled the cork and took a sniff. "Pfhewww!" he winced, "That stuff stinks and I don't think that I can stand it!" Frenchy raised the shotgun, cocked both of the hammers, pointed it at the kid's head and said: "I said drink!" Well, the kid squeezed his eyes shut, turned up the jug and took a long pull. He shuddered and gagged, but soon broke out into a big, silly grin. Frenchy retrieved the jug and handed the kid the scattergun. "And now, if you don't mind," says he, "You hold the gun on me and I'll have a drink too ….."
 
Top